Authentik
| Description / name | Input element |
|---|---|
| Your domain name |
Overview
Authentik is an open-source Identity Provider (IdP) and Single Sign-On (SSO) platform designed for self-hosting, enabling organizations to manage user authentication, authorization, and access controls with full control over their identity infrastructure.
Configuration
Info
    user: saltbox_user # (1)!
    password: saltbox_password # (2)!
- Replace
saltbox_userwith the username you set when installing Saltbox. - Replace
saltbox_passwordwith the password you set when installing Saltbox.
To enable Authentik with a single container, or on a per role basis, set the following inventory entry:
radarr_traefik_sso_middleware: "authentik@docker"
To enable Authentik globally, set the following inventory entry:
traefik_default_sso_middleware: "authentik@docker"
You would use one or the other, the global toggle will install Authentik together with Traefik when it is being installed, the role toggle requires manually installing Authentik. Traefik needs to be reinstalled at least once after updating to deploy the Authentik middleware to enable use of it. If you are using the global toggle, you will need to reinstall all of the other roles you use to enable Authentik.
To set up Authentik similarly to how we have Authelia set up, follow these steps:
After logging in, you will be greeted with the dashboard. Click on the Admin Interface button in the top right corner.
Click on the Flows and Stages drop down and select Stages.
Locate the default-authentication-login stage and click the Edit button. (Far right)
-
Below you will see the default User Login Stage info.
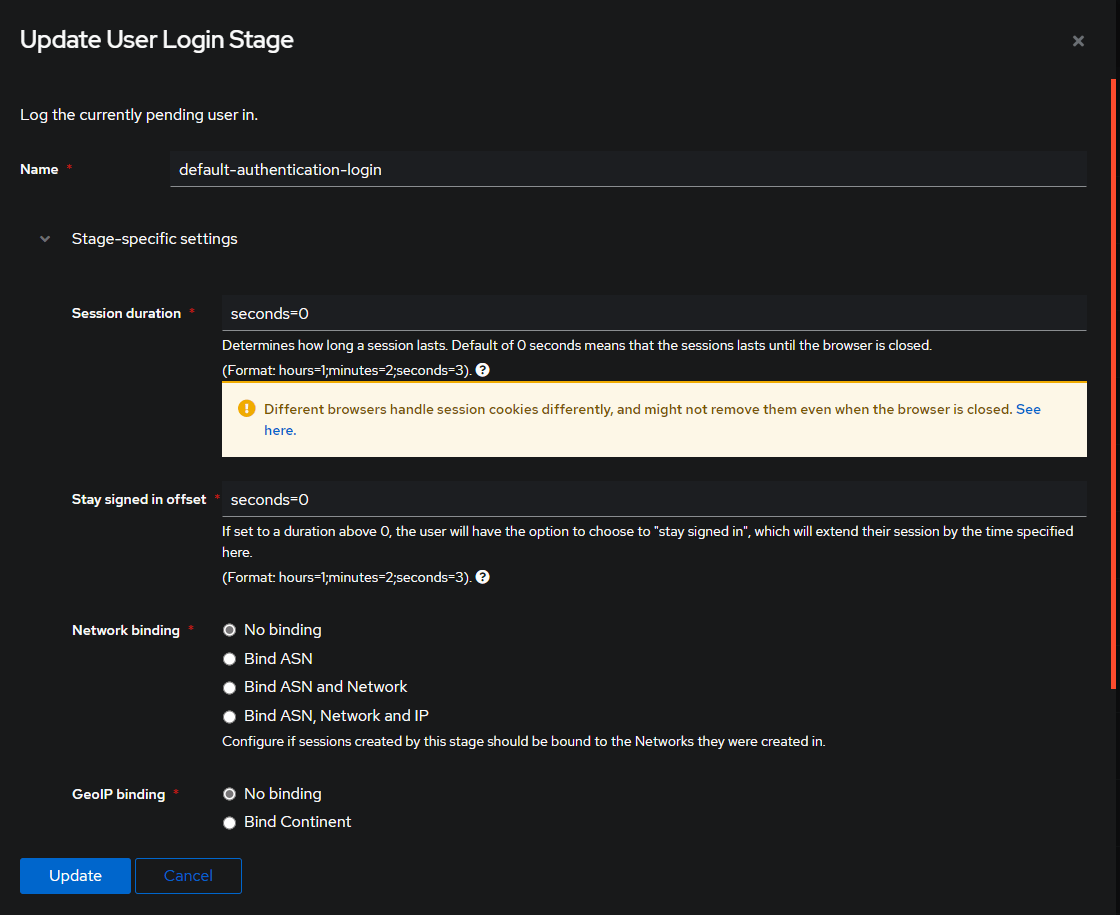
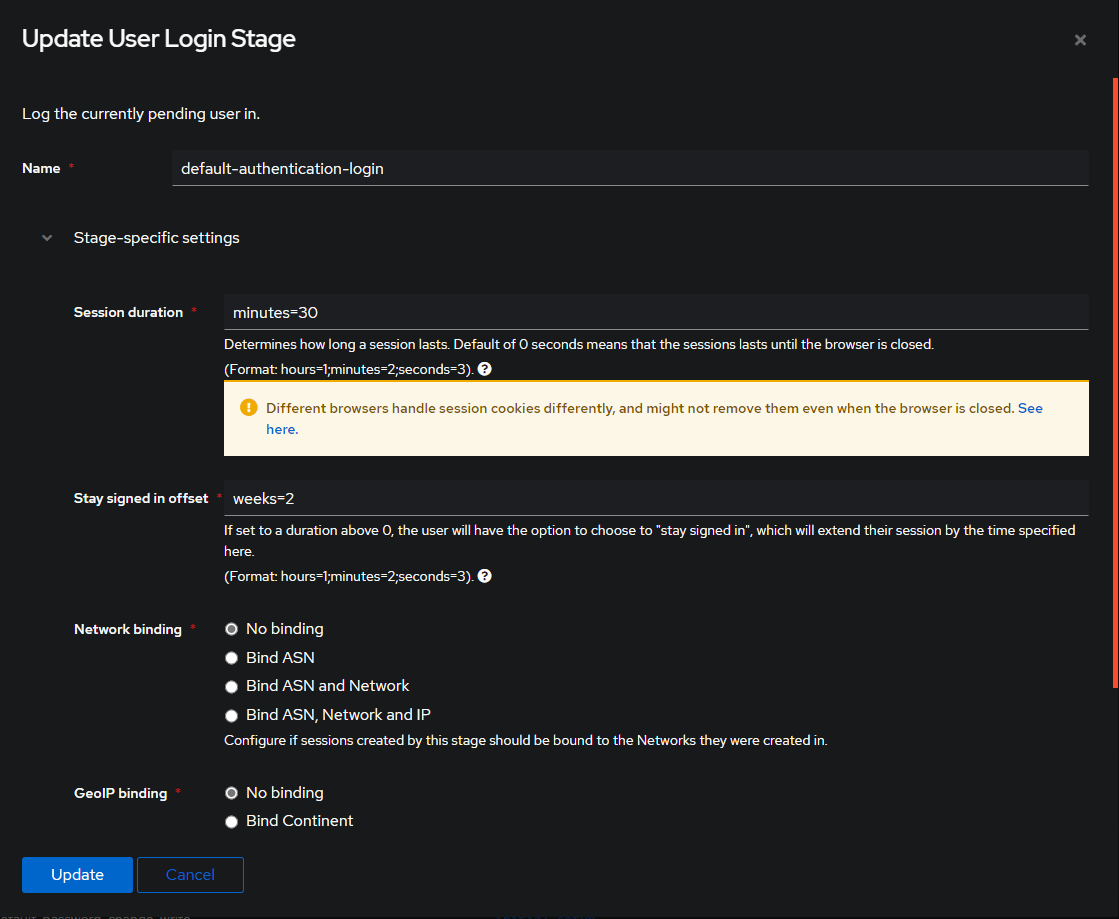
You can change these values to anything you want, but for this example, we will change the Session Duration to minutes=30 and the Stay Signed in Offset to weeks=2.
-
Below you will see the updated User Login Stage info.
Additional Settings
To enable email notifications, set these inventory entries to your desired values:
authentik_email_host: "localhost" # (1)!
authentik_email_port: "25" # (2)!
authentik_email_username: "" # (3)!
authentik_email_password: "" # (4)!
authentik_email_tls: "false"
authentik_email_ssl: "false"
authentik_email_timeout: "10" # (5)!
authentik_email_from: "authentik@localhost" # (6)!
- Replace
localhostwith your email host. IE:smtp-relay.gmail.com - Replace
25with your email port. IE:587 - Replace
""with your email username if necessary. - Replace
""with your email password if necessary. - Replace
10with your email timeout in seconds. - Replace
authentik@localhostwith your email from email address. IE:Authentik <noreply@iYOUR_DOMAIN_NAMEi>
Redeploy the Authentik role to apply these changes.
Deployment
sb install authentik
Usage
Visit https://auth.iYOUR_DOMAIN_NAMEi.
Basics
IDP/OIDC Configuration
To configure Authentik as an IDP (Identity Provider) or OIDC (OpenID Connect) provider, follow these steps:
Click on the Admin Interface button in the top right corner.
Locate the Applications tab on the left panel and click on it.
Near the center of the screen select the blue Create With Wizard button.
-
Below you will see the
Create Applicationscreen.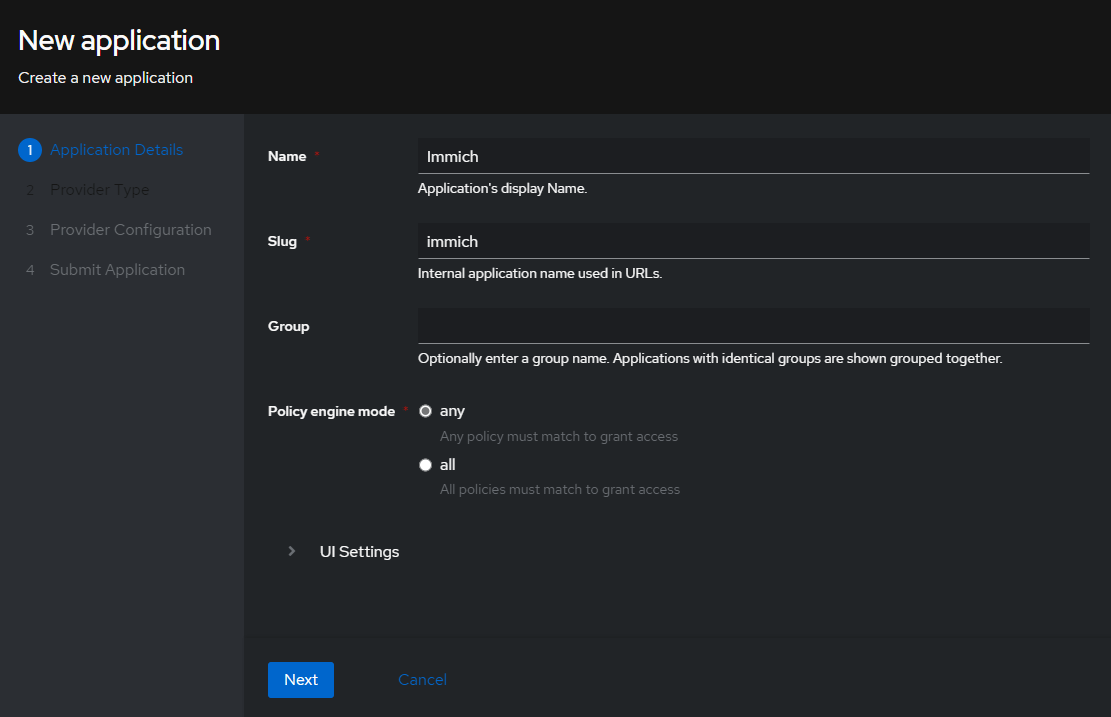
On the next screen select the Oauth2/OIDC option. (This will be the first option)
In this example, on the Configure OAuth2/OpenId Provider screen, only the required fields will be filled.
-
Below you will see the
Configure OAuth2screen.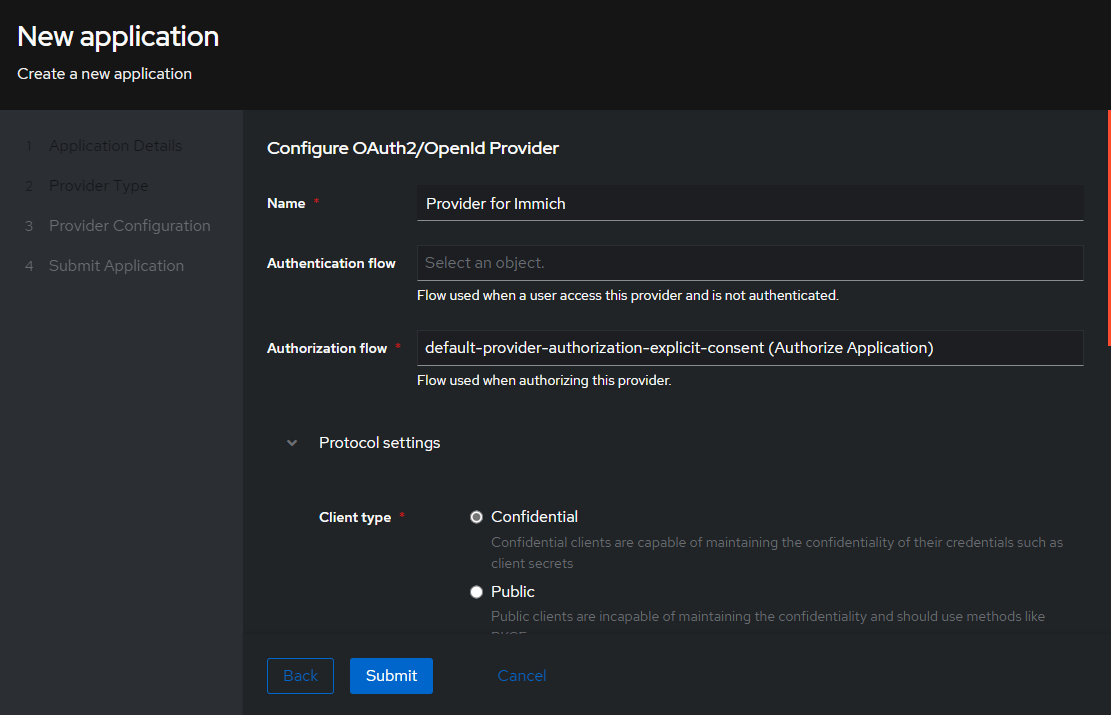
Under the Protocol Settings section, fill in the following fields:
Client ID:immich(This can be anything you want, and is auto filled in. You can change it if you want)Client Secret: Its probably best to leave this as is, but you can change it if you want.Redirect URI/Origins:https://immich.yourdomain.tld/auth/loginhttps://immich.yourdomain.tld/user-settingsapp.immich:/
OIDC Configuration Example
In the screenshot below, you can see how the Immich application is configured to use Authentik as an OIDC provider.
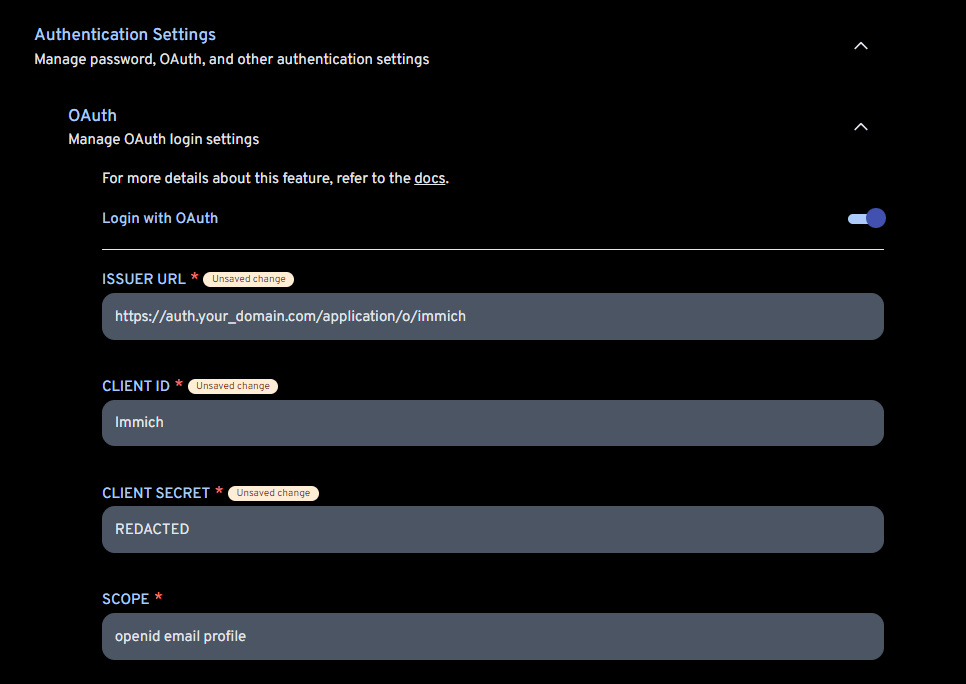
The only other field you need to concern yourself with is the Mobile Redirect URI, which is https://immich.yourdomain.tld/api/oauth/mobile-redirect.
Role Defaults
Variables can be customized using the Inventory. (1)
-
Example override
authentik_name: "custom_value"Avoid overriding variables ending in
_defaultWhen overriding variables that end in
_default(likeauthentik_docker_envs_default), you replace the entire default configuration. Future updates that add new default values will not be applied to your setup, potentially breaking functionality.Instead, use the corresponding
_customvariable (likeauthentik_docker_envs_custom) to add your changes. Custom values are merged with defaults, ensuring you receive updates.
authentik_name
# Type: string
authentik_name: authentik
authentik_role_email_host
# Type: string
authentik_role_email_host: "localhost"
authentik_role_email_port
# Type: string
authentik_role_email_port: "25"
authentik_role_email_username
# Type: string
authentik_role_email_username: ""
authentik_role_email_password
# Type: string
authentik_role_email_password: ""
authentik_role_email_tls
# Type: string
authentik_role_email_tls: "false"
authentik_role_email_ssl
# Type: string
authentik_role_email_ssl: "false"
authentik_role_email_timeout
# Type: string
authentik_role_email_timeout: "10"
authentik_role_email_from
# Type: string
authentik_role_email_from: "authentik@localhost"
authentik_role_access_token_validity
# Hours, only fresh installs use this
# Type: string
authentik_role_access_token_validity: "24"
authentik_role_postgres_deploy
# Authentik will always require postgres, this just allows you to skip the one Saltbox deploys
# Type: bool (true/false)
authentik_role_postgres_deploy: true
authentik_role_postgres_name
# Type: string
authentik_role_postgres_name: "{{ authentik_name }}-postgres"
authentik_role_postgres_user
# If empty it will fallback to postgres role default
# Type: string
authentik_role_postgres_user: ""
authentik_role_postgres_password
# If empty it will fallback to postgres role default
# Type: string
authentik_role_postgres_password: ""
authentik_role_postgres_docker_env_db
# Type: string
authentik_role_postgres_docker_env_db: "authentik"
authentik_role_postgres_docker_image_tag
# Type: string
authentik_role_postgres_docker_image_tag: "16-alpine"
authentik_role_postgres_docker_image_repo
# Type: string
authentik_role_postgres_docker_image_repo: "postgres"
authentik_role_postgres_docker_healthcheck
# Type: dict
authentik_role_postgres_docker_healthcheck:
  test: ["CMD-SHELL", "pg_isready -d {{ lookup('role_var', '_postgres_docker_env_db', role='authentik') }} -U {{ lookup('role_var', '_postgres_user', role='authentik') if (lookup('role_var', '_postgres_user', role='authentik') | length > 0) else lookup('role_var', '_docker_env_user', role='postgres') }}"]
  start_period: 20s
  interval: 30s
  retries: 5
  timeout: 5s
authentik_role_web_subdomain
# Type: string
authentik_role_web_subdomain: "auth"
authentik_role_web_domain
# Type: string
authentik_role_web_domain: "{{ user.domain }}"
authentik_role_web_port
# Type: string
authentik_role_web_port: "9000"
authentik_role_web_url
# Type: string
authentik_role_web_url: "{{ 'https://' + (lookup('role_var', '_web_subdomain', role='authentik') + '.' + lookup('role_var', '_web_domain', role='authentik')
                         if (lookup('role_var', '_web_subdomain', role='authentik') | length > 0)
                         else lookup('role_var', '_web_domain', role='authentik')) }}"
authentik_role_web_host
# Type: string
authentik_role_web_host: "{{ (lookup('role_var', '_web_subdomain', role='authentik') + '.' + lookup('role_var', '_web_domain', role='authentik')
                          if (lookup('role_var', '_web_subdomain', role='authentik') | length > 0)
                          else lookup('role_var', '_web_domain', role='authentik')) }}"
authentik_role_dns_record
# Type: string
authentik_role_dns_record: "{{ lookup('role_var', '_web_subdomain', role='authentik') }}"
authentik_role_dns_zone
# Type: string
authentik_role_dns_zone: "{{ lookup('role_var', '_web_domain', role='authentik') }}"
authentik_role_dns_proxy
# Type: bool (true/false)
authentik_role_dns_proxy: "{{ dns_proxied }}"
authentik_role_traefik_sso_middleware
# Type: string
authentik_role_traefik_sso_middleware: ""
authentik_role_traefik_middleware_default
# Type: string
authentik_role_traefik_middleware_default: "{{ traefik_default_middleware }}"
authentik_role_traefik_middleware_custom
# Type: string
authentik_role_traefik_middleware_custom: ""
authentik_role_traefik_certresolver
# Type: string
authentik_role_traefik_certresolver: "{{ traefik_default_certresolver }}"
authentik_role_traefik_enabled
# Type: bool (true/false)
authentik_role_traefik_enabled: true
authentik_role_traefik_api_enabled
# Type: bool (true/false)
authentik_role_traefik_api_enabled: false
authentik_role_traefik_api_endpoint
# Type: string
authentik_role_traefik_api_endpoint: ""
authentik_role_traefik_outpost_catch_all
# Type: bool (true/false)
authentik_role_traefik_outpost_catch_all: false
authentik_role_host
# Type: string
authentik_role_host: "http://{{ authentik_name }}:{{ lookup('role_var', '_web_port', role='authentik') }}"
authentik_role_default_user
# Type: string
authentik_role_default_user: "akadmin"
authentik_role_response_headers
# Type: list
authentik_role_response_headers:
  - "X-authentik-username"
  - "X-authentik-groups"
  - "X-authentik-entitlements"
  - "X-authentik-email"
  - "X-authentik-name"
  - "X-authentik-uid"
  - "X-authentik-jwt"
  - "X-authentik-meta-jwks"
  - "X-authentik-meta-outpost"
  - "X-authentik-meta-provider"
  - "X-authentik-meta-app"
  - "X-authentik-meta-version"
Container
authentik_role_docker_container
# Type: string
authentik_role_docker_container: "{{ authentik_name }}"
Image
authentik_role_docker_image_pull
# Type: bool (true/false)
authentik_role_docker_image_pull: true
authentik_role_docker_image_repo
# Type: string
authentik_role_docker_image_repo: "ghcr.io/goauthentik/server"
authentik_role_docker_image_tag
# Type: string
authentik_role_docker_image_tag: "2026.2"
authentik_role_docker_image
# Type: string
authentik_role_docker_image: "{{ lookup('role_var', '_docker_image_repo', role='authentik') }}:{{ lookup('role_var', '_docker_image_tag', role='authentik') }}"
Envs
authentik_role_docker_envs_default
# Type: dict
authentik_role_docker_envs_default:
  AUTHENTIK_POSTGRESQL__HOST: "{{ lookup('role_var', '_postgres_name', role='authentik') }}"
  AUTHENTIK_POSTGRESQL__USER: "{{ lookup('role_var', '_postgres_user', role='authentik')
                               if (lookup('role_var', '_postgres_user', role='authentik') | length > 0)
                               else lookup('role_var', '_docker_env_user', role='postgres') }}"
  AUTHENTIK_POSTGRESQL__NAME: "{{ lookup('role_var', '_postgres_docker_env_db', role='authentik') }}"
  AUTHENTIK_POSTGRESQL__PASSWORD: "{{ lookup('role_var', '_postgres_password', role='authentik')
                                   if (lookup('role_var', '_postgres_password', role='authentik') | length > 0)
                                   else lookup('role_var', '_docker_env_password', role='postgres') }}"
  AUTHENTIK_SECRET_KEY: "{{ authentik_saltbox_facts.facts.secret_key }}"
  AUTHENTIK_BOOTSTRAP_TOKEN: "{{ omit
                              if authentik_data_folder.stat.exists
                              else authentik_bootstrap_token }}"
  AUTHENTIK_EMAIL__HOST: "{{ lookup('role_var', '_email_host', role='authentik') }}"
  AUTHENTIK_EMAIL__PORT: "{{ lookup('role_var', '_email_port', role='authentik') }}"
  AUTHENTIK_EMAIL__USERNAME: "{{ lookup('role_var', '_email_username', role='authentik') }}"
  AUTHENTIK_EMAIL__PASSWORD: "{{ lookup('role_var', '_email_password', role='authentik') }}"
  AUTHENTIK_EMAIL__USE_TLS: "{{ lookup('role_var', '_email_tls', role='authentik') }}"
  AUTHENTIK_EMAIL__USE_SSL: "{{ lookup('role_var', '_email_ssl', role='authentik') }}"
  AUTHENTIK_EMAIL__TIMEOUT: "{{ lookup('role_var', '_email_timeout', role='authentik') }}"
  AUTHENTIK_EMAIL__FROM: "{{ lookup('role_var', '_email_from', role='authentik') }}"
  AUTHENTIK_LISTEN__TRUSTED_PROXY_CIDRS: "172.19.0.0/16"
authentik_role_docker_envs_custom
# Type: dict
authentik_role_docker_envs_custom: {}
Commands
authentik_role_docker_commands_default
# Type: list
authentik_role_docker_commands_default:
  - "server"
authentik_role_docker_commands_custom
# Type: list
authentik_role_docker_commands_custom: []
Volumes
authentik_role_docker_volumes_default
# Type: list
authentik_role_docker_volumes_default:
  - "{{ authentik_role_paths_location }}/data:/data"
  - "{{ authentik_role_paths_location }}/custom-templates:/templates"
authentik_role_docker_volumes_custom
# Type: list
authentik_role_docker_volumes_custom: []
Labels
authentik_role_docker_labels_default
# Type: dict
authentik_role_docker_labels_default:
  traefik.http.routers.authentik-outpost-http.entrypoints: "web"
  traefik.http.routers.authentik-outpost-http.service: "authentik-outpost-http"
  traefik.http.routers.authentik-outpost-http.rule: "PathPrefix(`/outpost.goauthentik.io/`)"
  traefik.http.routers.authentik-outpost-http.middlewares: "{{ traefik_default_middleware_http }}"
  traefik.http.routers.authentik-outpost-http.priority: "99"
  traefik.http.routers.authentik-outpost.entrypoints: "websecure"
  traefik.http.routers.authentik-outpost.service: "authentik-outpost"
  traefik.http.routers.authentik-outpost.rule: "PathPrefix(`/outpost.goauthentik.io/`)"
  traefik.http.routers.authentik-outpost.tls.options: "securetls@file"
  traefik.http.routers.authentik-outpost.tls.certresolver: "{{ authentik_role_traefik_certresolver }}"
  traefik.http.routers.authentik-outpost.middlewares: "{{ traefik_default_middleware }}"
  traefik.http.routers.authentik-outpost.priority: "99"
  traefik.http.services.authentik-outpost-http.loadbalancer.server.port: "{{ lookup('role_var', '_web_port', role='authentik') }}"
  traefik.http.services.authentik-outpost.loadbalancer.server.port: "{{ lookup('role_var', '_web_port', role='authentik') }}"
authentik_role_docker_labels_custom
# Type: dict
authentik_role_docker_labels_custom: {}
Hostname
authentik_role_docker_hostname
# Type: string
authentik_role_docker_hostname: "{{ authentik_name }}"
Networks
authentik_role_docker_networks_alias
# Type: string
authentik_role_docker_networks_alias: "{{ authentik_name }}"
authentik_role_docker_networks_default
# Type: list
authentik_role_docker_networks_default: []
authentik_role_docker_networks_custom
# Type: list
authentik_role_docker_networks_custom: []
Restart Policy
authentik_role_docker_restart_policy
# Type: string
authentik_role_docker_restart_policy: unless-stopped
State
authentik_role_docker_state
# Type: string
authentik_role_docker_state: started
Dependencies
authentik_role_depends_on
# Type: string
authentik_role_depends_on: "{{ lookup('role_var', '_postgres_name', role='authentik') }}"
authentik_role_depends_on_delay
# Type: string (quoted number)
authentik_role_depends_on_delay: "0"
authentik_role_depends_on_healthchecks
# Type: string ("true"/"false")
authentik_role_depends_on_healthchecks: "true"
The following advanced options are available via create_docker_container but are not defined in the role. See: docker_container module
Resource Limits
authentik_role_docker_blkio_weight
# Type: int
authentik_role_docker_blkio_weight:
authentik_role_docker_cpu_period
# Type: int
authentik_role_docker_cpu_period:
authentik_role_docker_cpu_quota
# Type: int
authentik_role_docker_cpu_quota:
authentik_role_docker_cpu_shares
# Type: int
authentik_role_docker_cpu_shares:
authentik_role_docker_cpus
# Type: string
authentik_role_docker_cpus:
authentik_role_docker_cpuset_cpus
# Type: string
authentik_role_docker_cpuset_cpus:
authentik_role_docker_cpuset_mems
# Type: string
authentik_role_docker_cpuset_mems:
authentik_role_docker_kernel_memory
# Type: string
authentik_role_docker_kernel_memory:
authentik_role_docker_memory
# Type: string
authentik_role_docker_memory:
authentik_role_docker_memory_reservation
# Type: string
authentik_role_docker_memory_reservation:
authentik_role_docker_memory_swap
# Type: string
authentik_role_docker_memory_swap:
authentik_role_docker_memory_swappiness
# Type: int
authentik_role_docker_memory_swappiness:
authentik_role_docker_shm_size
# Type: string
authentik_role_docker_shm_size:
Security & Devices
authentik_role_docker_cap_drop
# Type: list
authentik_role_docker_cap_drop:
authentik_role_docker_cgroupns_mode
# Type: string
authentik_role_docker_cgroupns_mode:
authentik_role_docker_device_cgroup_rules
# Type: list
authentik_role_docker_device_cgroup_rules:
authentik_role_docker_device_read_bps
# Type: list
authentik_role_docker_device_read_bps:
authentik_role_docker_device_read_iops
# Type: list
authentik_role_docker_device_read_iops:
authentik_role_docker_device_requests
# Type: list
authentik_role_docker_device_requests:
authentik_role_docker_device_write_bps
# Type: list
authentik_role_docker_device_write_bps:
authentik_role_docker_device_write_iops
# Type: list
authentik_role_docker_device_write_iops:
authentik_role_docker_devices
# Type: list
authentik_role_docker_devices:
authentik_role_docker_groups
# Type: list
authentik_role_docker_groups:
authentik_role_docker_privileged
# Type: bool (true/false)
authentik_role_docker_privileged:
authentik_role_docker_security_opts
# Type: list
authentik_role_docker_security_opts:
authentik_role_docker_user
# Type: string
authentik_role_docker_user:
authentik_role_docker_userns_mode
# Type: string
authentik_role_docker_userns_mode:
Networking
authentik_role_docker_dns_opts
# Type: list
authentik_role_docker_dns_opts:
authentik_role_docker_dns_search_domains
# Type: list
authentik_role_docker_dns_search_domains:
authentik_role_docker_dns_servers
# Type: list
authentik_role_docker_dns_servers:
authentik_role_docker_domainname
# Type: string
authentik_role_docker_domainname:
authentik_role_docker_exposed_ports
# Type: list
authentik_role_docker_exposed_ports:
authentik_role_docker_hosts
# Type: dict
authentik_role_docker_hosts:
authentik_role_docker_hosts_use_common
# Type: bool (true/false)
authentik_role_docker_hosts_use_common:
authentik_role_docker_ipc_mode
# Type: string
authentik_role_docker_ipc_mode:
authentik_role_docker_links
# Type: list
authentik_role_docker_links:
authentik_role_docker_network_mode
# Type: string
authentik_role_docker_network_mode:
authentik_role_docker_pid_mode
# Type: string
authentik_role_docker_pid_mode:
authentik_role_docker_ports
# Type: list
authentik_role_docker_ports:
authentik_role_docker_uts
# Type: string
authentik_role_docker_uts:
Storage
authentik_role_docker_keep_volumes
# Type: bool (true/false)
authentik_role_docker_keep_volumes:
authentik_role_docker_mounts
# Type: list
authentik_role_docker_mounts:
authentik_role_docker_storage_opts
# Type: dict
authentik_role_docker_storage_opts:
authentik_role_docker_tmpfs
# Type: list
authentik_role_docker_tmpfs:
authentik_role_docker_volume_driver
# Type: string
authentik_role_docker_volume_driver:
authentik_role_docker_volumes_from
# Type: list
authentik_role_docker_volumes_from:
authentik_role_docker_volumes_global
# Type: bool (true/false)
authentik_role_docker_volumes_global:
authentik_role_docker_working_dir
# Type: string
authentik_role_docker_working_dir:
Monitoring & Lifecycle
authentik_role_docker_auto_remove
# Type: bool (true/false)
authentik_role_docker_auto_remove:
authentik_role_docker_cleanup
# Type: bool (true/false)
authentik_role_docker_cleanup:
authentik_role_docker_force_kill
# Type: string
authentik_role_docker_force_kill:
authentik_role_docker_healthcheck
# Type: dict
authentik_role_docker_healthcheck:
authentik_role_docker_healthy_wait_timeout
# Type: int
authentik_role_docker_healthy_wait_timeout:
authentik_role_docker_init
# Type: bool (true/false)
authentik_role_docker_init:
authentik_role_docker_kill_signal
# Type: string
authentik_role_docker_kill_signal:
authentik_role_docker_log_driver
# Type: string
authentik_role_docker_log_driver:
authentik_role_docker_log_options
# Type: dict
authentik_role_docker_log_options:
authentik_role_docker_oom_killer
# Type: bool (true/false)
authentik_role_docker_oom_killer:
authentik_role_docker_oom_score_adj
# Type: int
authentik_role_docker_oom_score_adj:
authentik_role_docker_output_logs
# Type: bool (true/false)
authentik_role_docker_output_logs:
authentik_role_docker_paused
# Type: bool (true/false)
authentik_role_docker_paused:
authentik_role_docker_recreate
# Type: bool (true/false)
authentik_role_docker_recreate:
authentik_role_docker_restart_retries
# Type: int
authentik_role_docker_restart_retries:
authentik_role_docker_stop_signal
# Type: string
authentik_role_docker_stop_signal:
authentik_role_docker_stop_timeout
# Type: int
authentik_role_docker_stop_timeout:
Other Options
authentik_role_docker_capabilities
# Type: list
authentik_role_docker_capabilities:
authentik_role_docker_cgroup_parent
# Type: string
authentik_role_docker_cgroup_parent:
authentik_role_docker_create_timeout
# Type: int
authentik_role_docker_create_timeout:
authentik_role_docker_entrypoint
# Type: string
authentik_role_docker_entrypoint:
authentik_role_docker_env_file
# Type: string
authentik_role_docker_env_file:
authentik_role_docker_labels_use_common
# Type: bool (true/false)
authentik_role_docker_labels_use_common:
authentik_role_docker_read_only
# Type: bool (true/false)
authentik_role_docker_read_only:
authentik_role_docker_runtime
# Type: string
authentik_role_docker_runtime:
authentik_role_docker_sysctls
# Type: list
authentik_role_docker_sysctls:
authentik_role_docker_ulimits
# Type: list
authentik_role_docker_ulimits:
authentik_role_autoheal_enabled
# Enable or disable Autoheal monitoring for the container created when deploying
# Type: bool (true/false)
authentik_role_autoheal_enabled: true
authentik_role_diun_enabled
# Enable or disable Diun update notifications for the container created when deploying
# Type: bool (true/false)
authentik_role_diun_enabled: true
authentik_role_dns_enabled
# Enable or disable automatic DNS record creation for the container
# Type: bool (true/false)
authentik_role_dns_enabled: true
authentik_role_docker_controller
# Enable or disable Saltbox Docker Controller management for the container
# Type: bool (true/false)
authentik_role_docker_controller: true
authentik_role_docker_networks_alias_custom
# Type: list
authentik_role_docker_networks_alias_custom:
authentik_role_docker_volumes_download
# Type: bool (true/false)
authentik_role_docker_volumes_download:
authentik_role_themepark_addons
# Type: string
authentik_role_themepark_addons:
authentik_role_themepark_app
# Type: string
authentik_role_themepark_app:
authentik_role_themepark_theme
# Type: string
authentik_role_themepark_theme:
authentik_role_traefik_api_middleware
# Type: string
authentik_role_traefik_api_middleware:
authentik_role_traefik_api_middleware_http
# Type: string
authentik_role_traefik_api_middleware_http:
authentik_role_traefik_autodetect_enabled
# Enable Traefik autodetect middleware for the container
# Type: bool (true/false)
authentik_role_traefik_autodetect_enabled: false
authentik_role_traefik_crowdsec_enabled
# Enable CrowdSec middleware for the container
# Type: bool (true/false)
authentik_role_traefik_crowdsec_enabled: false
authentik_role_traefik_error_pages_enabled
# Enable custom error pages middleware for the container
# Type: bool (true/false)
authentik_role_traefik_error_pages_enabled: false
authentik_role_traefik_gzip_enabled
# Enable gzip compression middleware for the container
# Type: bool (true/false)
authentik_role_traefik_gzip_enabled: false
authentik_role_traefik_middleware_http
# Type: string
authentik_role_traefik_middleware_http:
authentik_role_traefik_middleware_http_api_insecure
# Type: bool (true/false)
authentik_role_traefik_middleware_http_api_insecure:
authentik_role_traefik_middleware_http_insecure
# Type: bool (true/false)
authentik_role_traefik_middleware_http_insecure:
authentik_role_traefik_priority
# Type: string
authentik_role_traefik_priority:
authentik_role_traefik_robot_enabled
# Enable robots.txt middleware for the container
# Type: bool (true/false)
authentik_role_traefik_robot_enabled: true
authentik_role_traefik_tailscale_enabled
# Enable Tailscale-specific Traefik configuration for the container
# Type: bool (true/false)
authentik_role_traefik_tailscale_enabled: false
authentik_role_traefik_wildcard_enabled
# Enable wildcard certificate for the container
# Type: bool (true/false)
authentik_role_traefik_wildcard_enabled: true
authentik_role_web_api_http_port
# Type: string (quoted number)
authentik_role_web_api_http_port:
authentik_role_web_api_http_scheme
# Type: string ("http"/"https")
authentik_role_web_api_http_scheme:
authentik_role_web_api_http_serverstransport
# Type: dict/omit
authentik_role_web_api_http_serverstransport:
authentik_role_web_api_port
# Type: string (quoted number)
authentik_role_web_api_port:
authentik_role_web_api_scheme
# Type: string ("http"/"https")
authentik_role_web_api_scheme:
authentik_role_web_api_serverstransport
# Type: dict/omit
authentik_role_web_api_serverstransport:
authentik_role_web_fqdn_override
# Override the Traefik fully qualified domain name (FQDN) for the container
# Type: list
authentik_role_web_fqdn_override:
Example Override
authentik_role_web_fqdn_override:
  - "{{ traefik_host }}"
  - "authentik2.{{ user.domain }}"
  - "authentik.otherdomain.tld"
Note: Include {{ traefik_host }} to preserve the default FQDN alongside your custom entries
authentik_role_web_host_override
# Override the Traefik web host configuration for the container
# Type: string
authentik_role_web_host_override:
Example Override
authentik_role_web_host_override: "Host(`{{ traefik_host }}`) || Host(`{{ 'authentik2.' + user.domain }}`)"
Note: Use {{ traefik_host }} to include the default host configuration in your custom rule
authentik_role_web_http_port
# Type: string (quoted number)
authentik_role_web_http_port:
authentik_role_web_http_scheme
# Type: string ("http"/"https")
authentik_role_web_http_scheme:
authentik_role_web_http_serverstransport
# Type: dict/omit
authentik_role_web_http_serverstransport:
authentik_role_web_scheme
# URL scheme to use for web access to the container
# Type: string ("http"/"https")
authentik_role_web_scheme:
authentik_role_web_serverstransport
# Type: dict/omit
authentik_role_web_serverstransport: