Organizr
| Description / name | Input element |
|---|---|
| Your domain name |
Overview
Organizr is a free, open-source, web-based dashboard designed to organize and manage multiple server services, particularly for home theater PCs (HTPCs) and homelabs.
Deployment
sb install organizr
Usage
Visit https://organizr.iYOUR_DOMAIN_NAMEi.
Basics
Initial Setup
-
The first time you go to the Organizr page, you will be presented with
Install Type,Admin Info,Security,DatabaseandVerifysections. In theInstall Typesection selectPersonal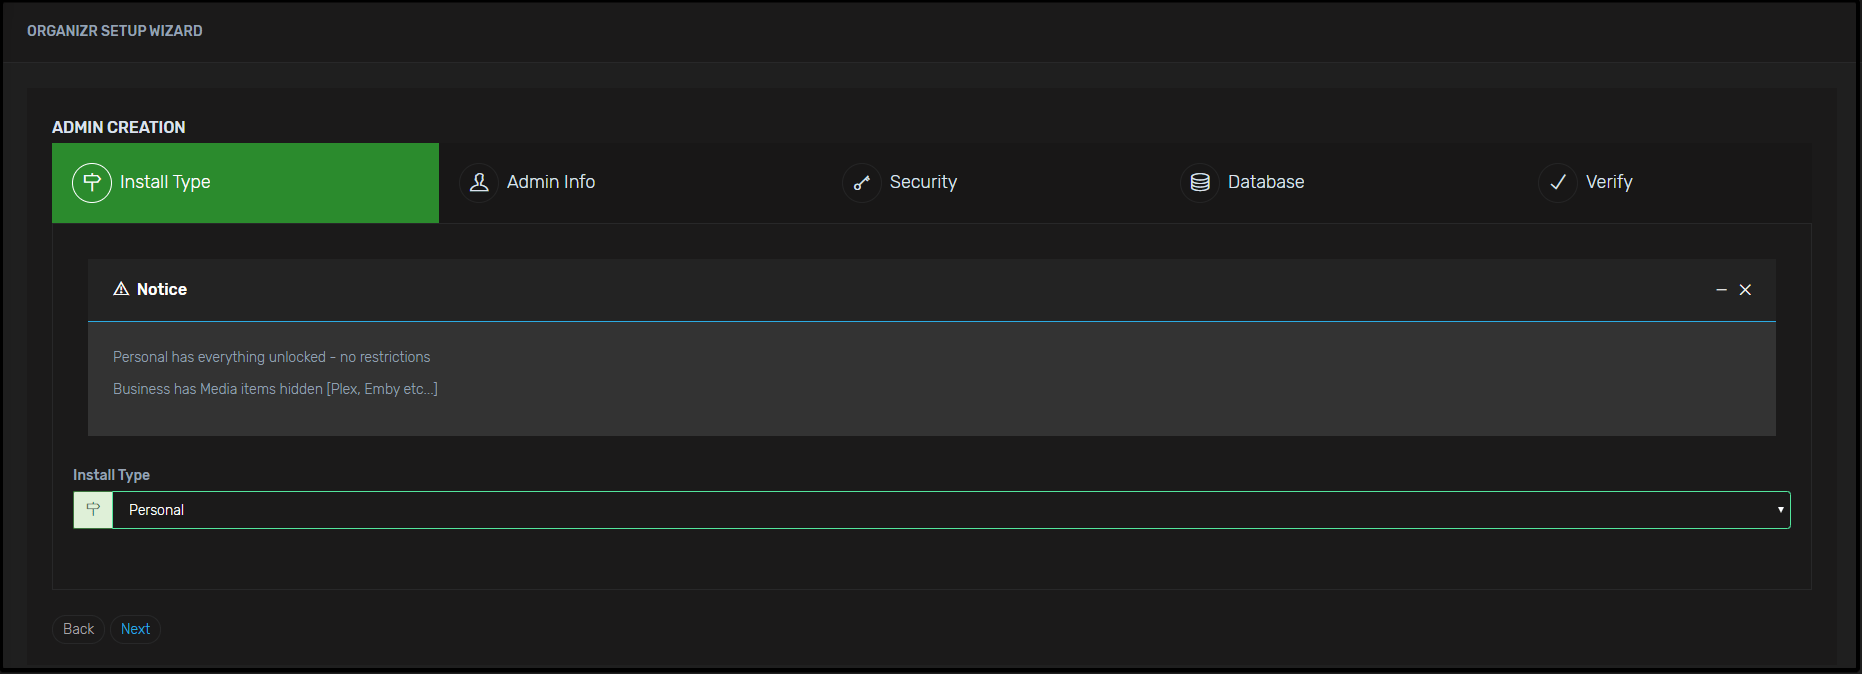
-
In the
Admin Infosection enter your details such as the preferred password to log in and personal email. Note: it is suggested to enter yourplex username and password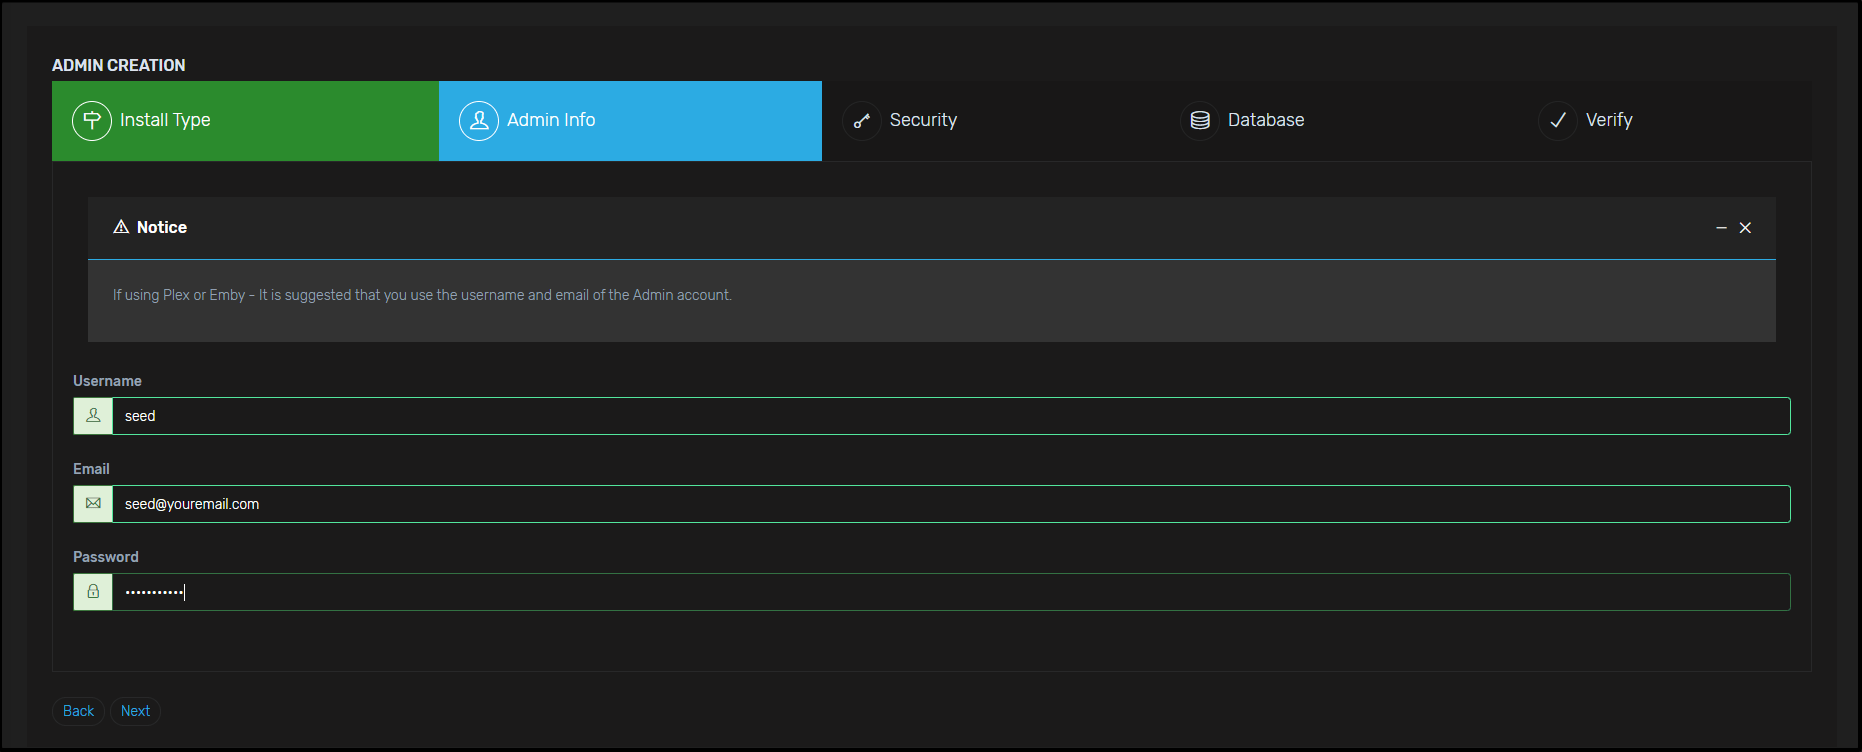
-
In the
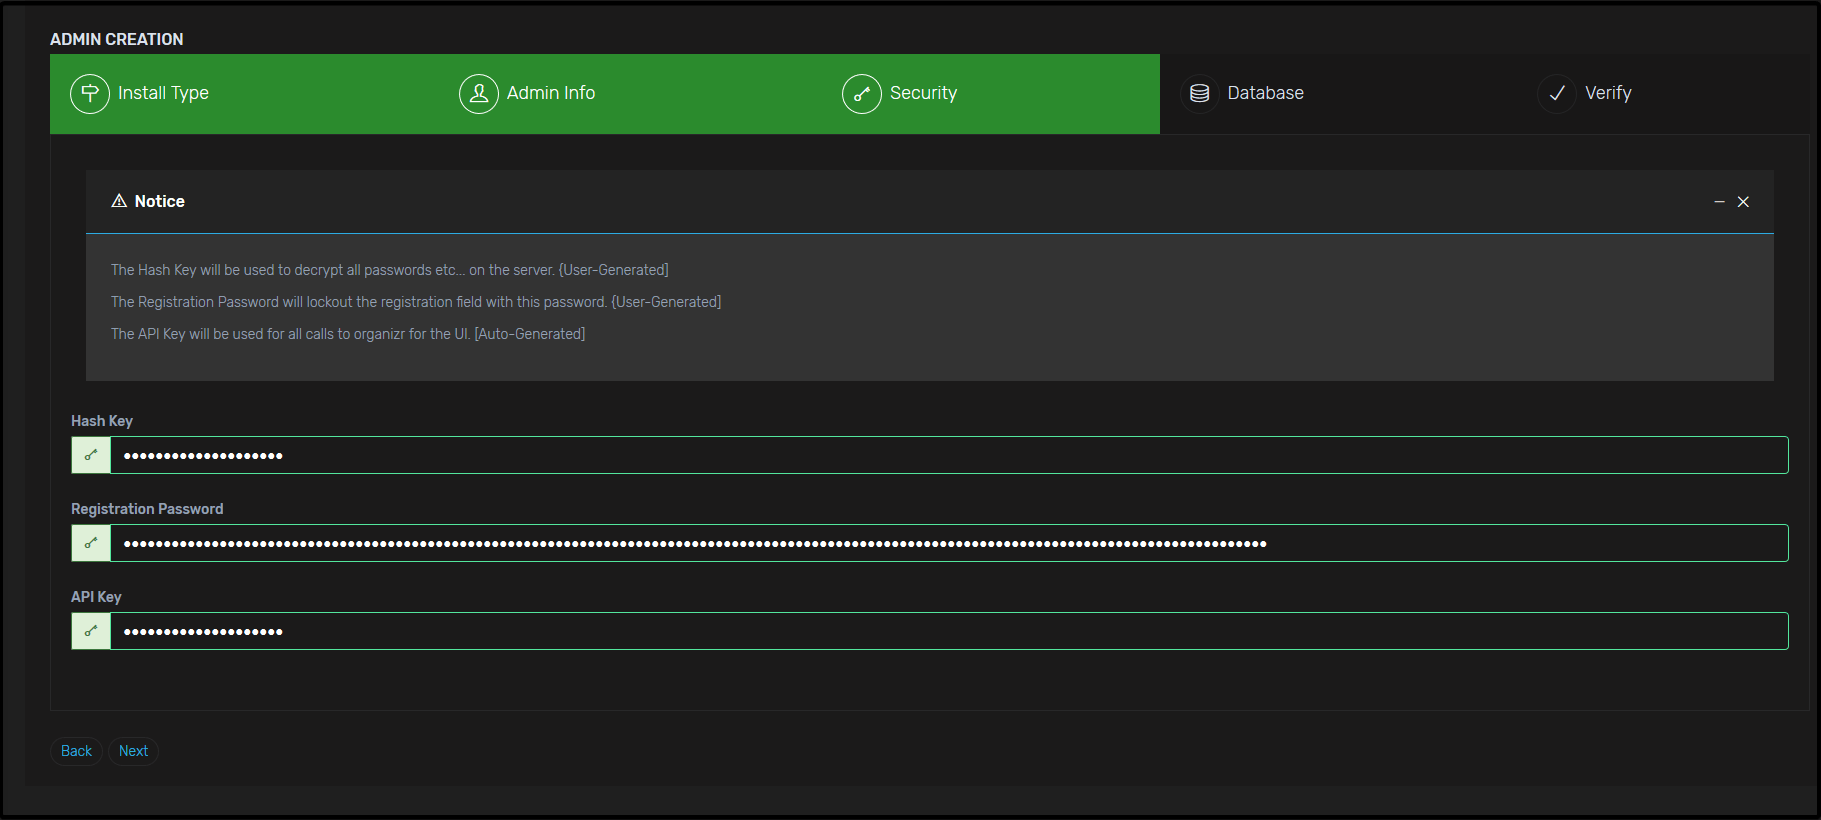
Securitysection enter your fill in theHash KeyandRegistration Passwordany type of password will do but if you want a secure one then follow these steps; -
First for the
Hash Keyyou can head over to Base64 Encode and convert a string to Base64. Keep in mind theHash Keycan be anywhere between 3 to 30 which mean you can enter string up to 21 characters in Base64 -
For the password just use any strong password you prefer, if you want a strong one then Password Generator, there is no limit on the password section go crazy ;)
- The API key should be auto-generated so no need to worry about this if the API key is throwing an error such as shorter than it suppose to be or longer it's most likely due to the web browser auto-fill, make sure it's disabled or just use another browser that doesn't have auto-fill or you don't use much e.g Internet Explorer 👀.
You should have something like this:
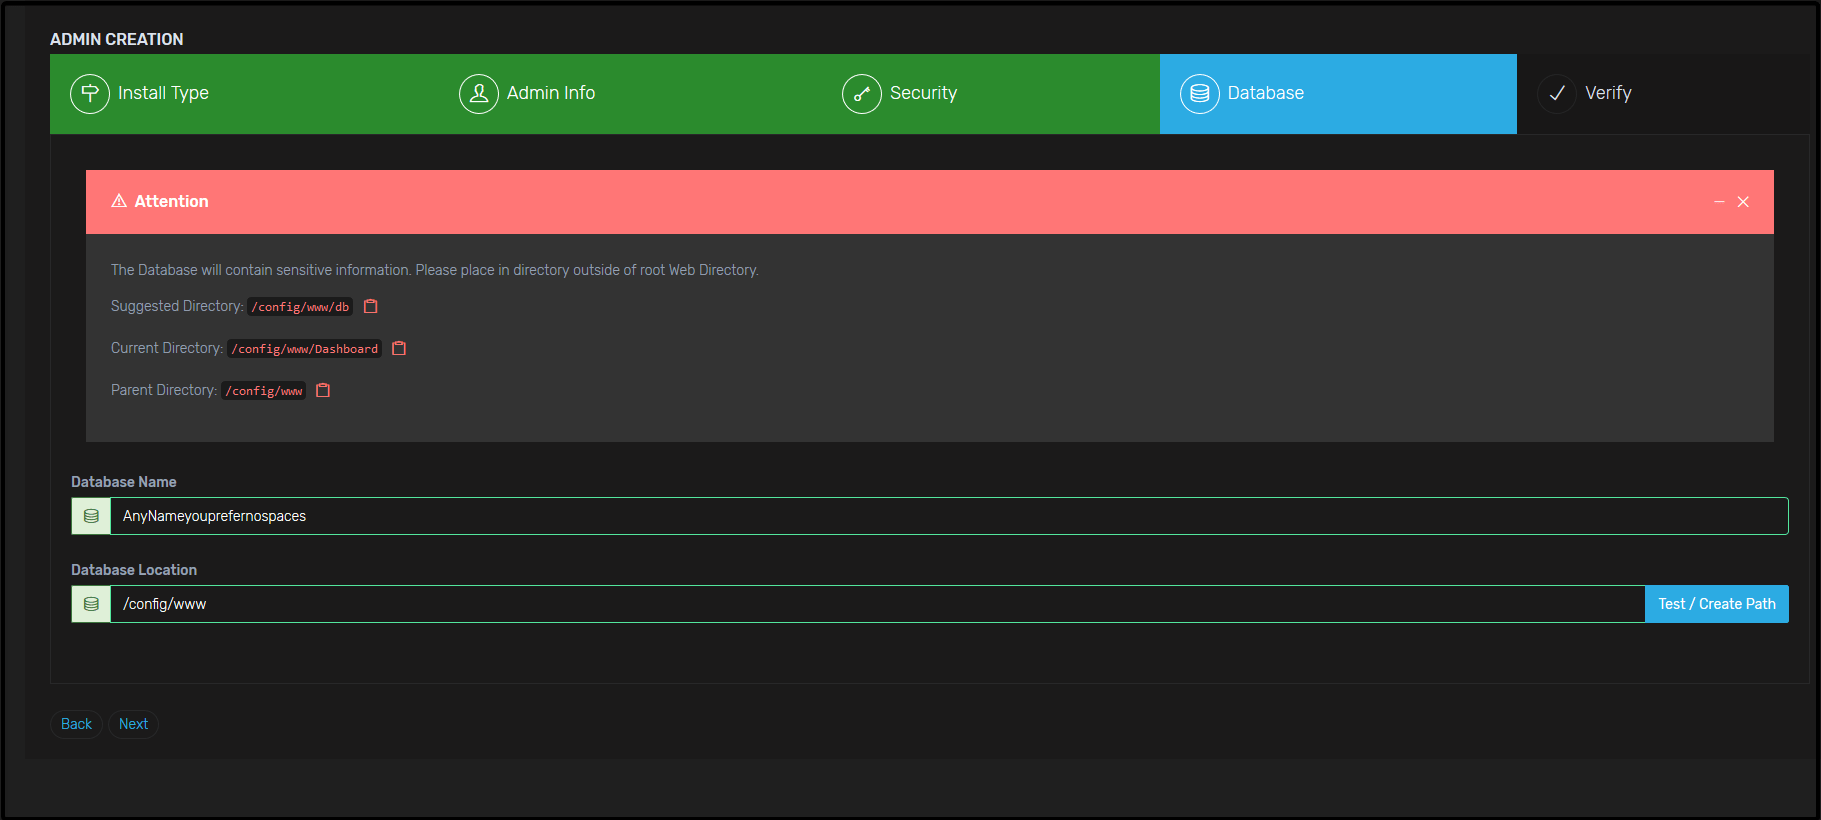
- In the
Databasesection enter your preferred database name (there is 30 character limit), then after that for the "Database Location" set it as/config/wwwthen click test path it should be a success.
You should have something like this:
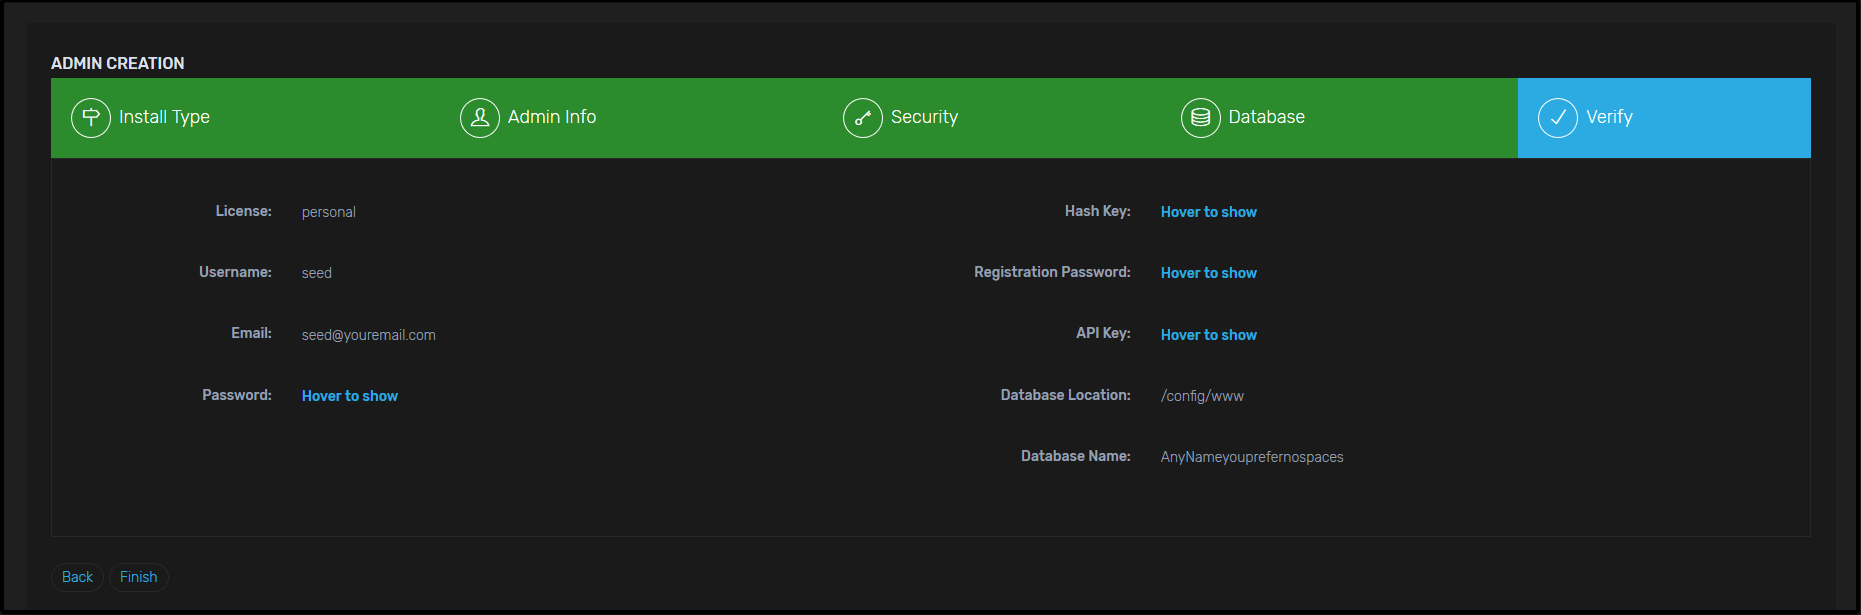
- In the
Verifysection you will just need to confirm everything but feel free to take note of your API key and save it somewhere safe. After clicking finish you will be taken to a log in the page just enter theusernameandpasswordyou have inserted in theAdmin infosection.
You should have something like this:
Settings
-
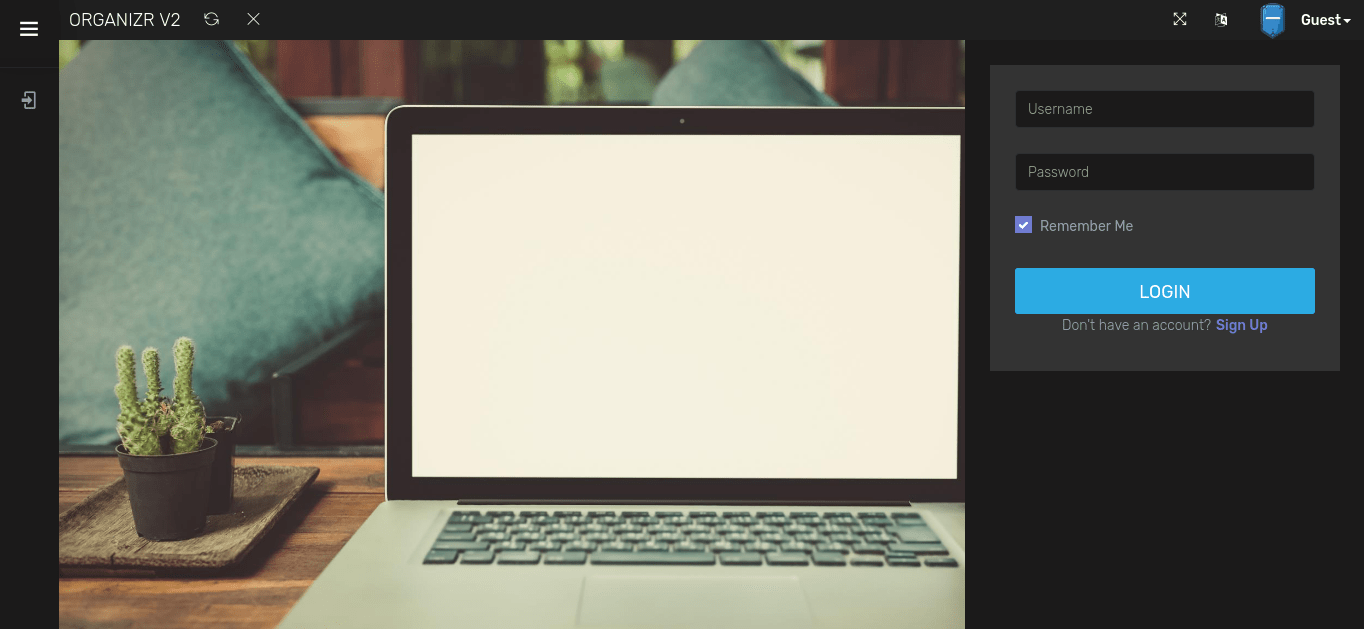
You will now be taken to the main Organizr Page and asked to login with the credentials you created in the previous steps.
Tabs
-
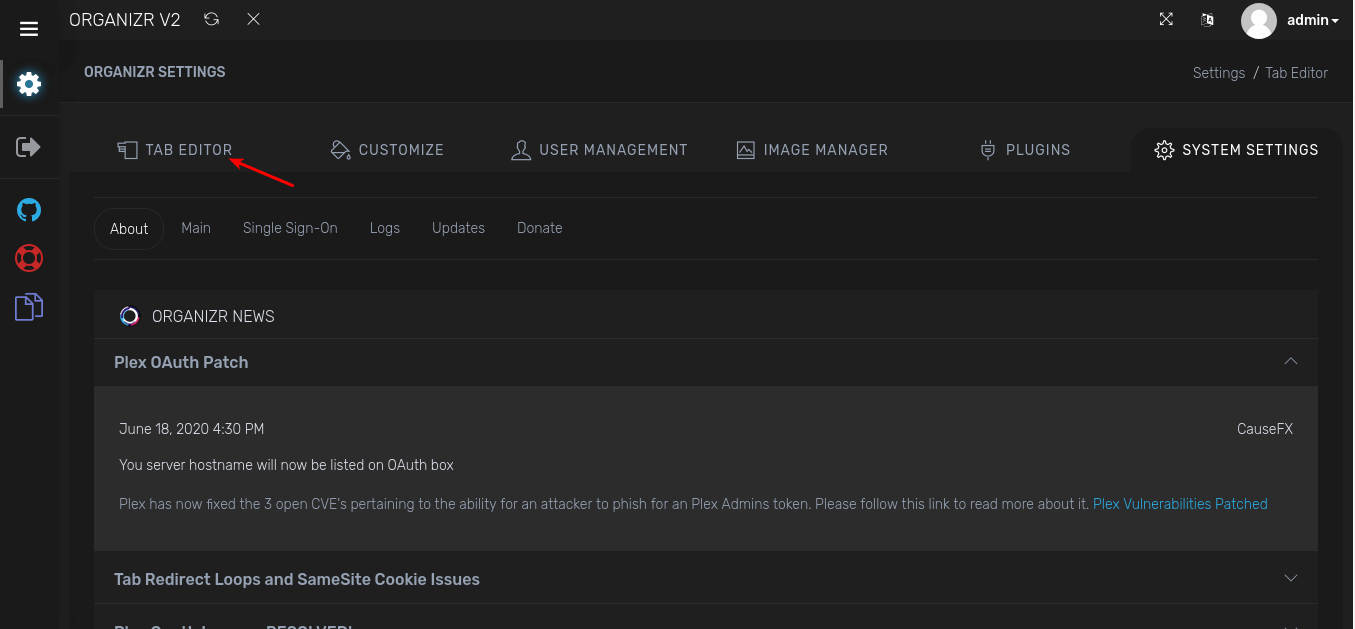
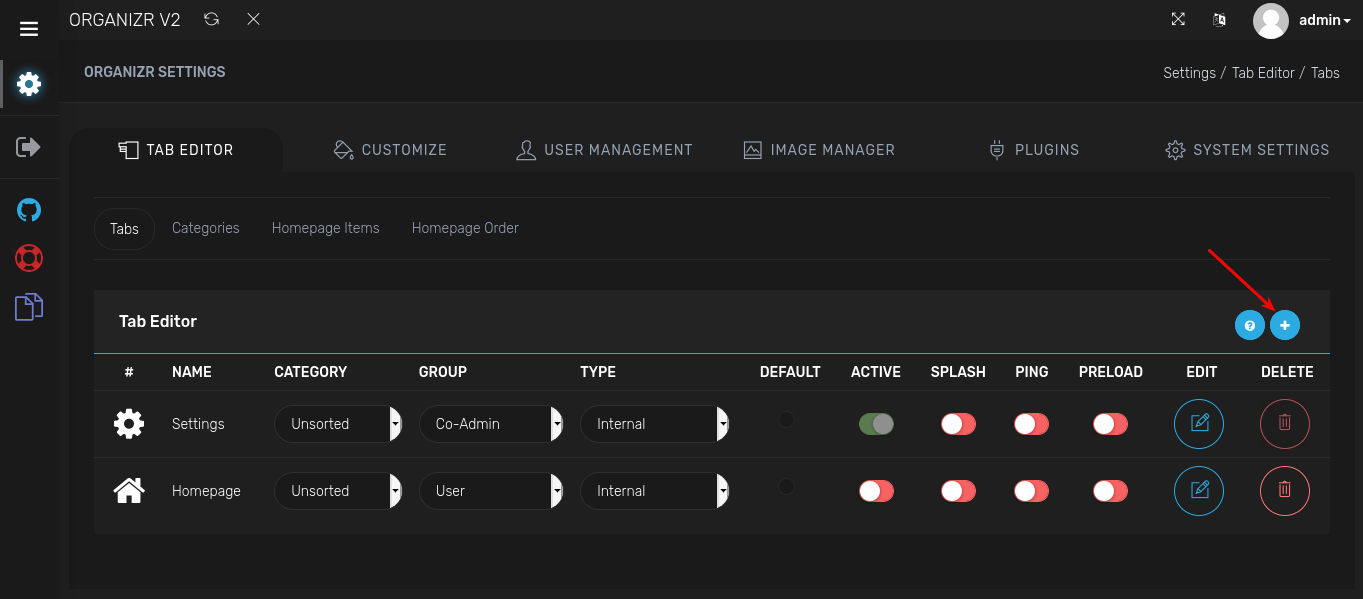
Click "Settings" on the left menu, to be taken to the "Organizr Settings" page.
-
Things to note on this page, the Homepage is disabled by default and note the "Type" is set to "Internal". Your normal Apps with Saltbox will all need to have a Type: "iFrame" unless you have a particular app you wish to open in another window which is also a Type option. Go ahead and click "+ on the right". You will be prompted for information regarding the tab.
-
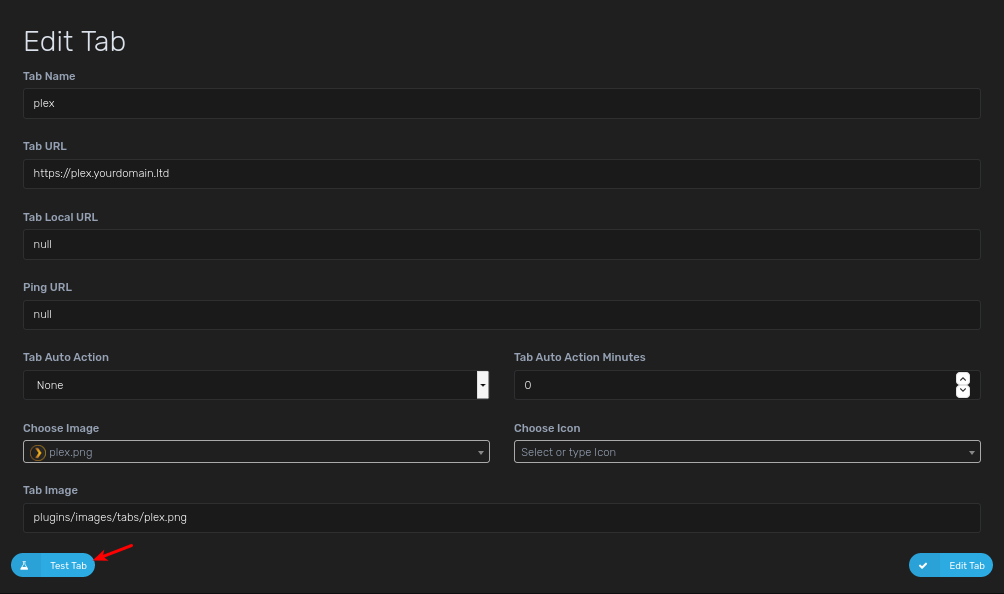
Before hitting the Edit Tab button in the bottom right, please hit the "Test Tab" button, sometimes the Tab will check for you if iFrame is possible. This will test if the information you inputted can be open in an iFrame. Which is the secret sauce in Organizr's tabbed browsing.
-
You will need to create multiple tabs with the information below. These are merely a suggestion and examples to get you up and going. Any changes made, won't be reflected until Organizr is reloaded. You can also drag and drop to change the order of the apps (don't forget to reload)
Tab Name Tab URL Icon URL Category Group Type Active Portainer https://portainer.iYOUR_DOMAIN_NAMEi images/organizr.png (default) Unsorted Admin iFrame Y Sonarr https://sonarr.iYOUR_DOMAIN_NAMEi images/sonarr.png Unsorted Admin iFrame Y Radarr https://radarr.iYOUR_DOMAIN_NAMEi images/radarr.png Unsorted Admin iFrame Y NZBGet https://nzbget.iYOUR_DOMAIN_NAMEi images/nzbget.png Unsorted Admin iFrame Y qbittorrent https://qbittorrent.iYOUR_DOMAIN_NAMEi images/qbittorrent.png Unsorted Admin iFrame Y NZBHydra2 https://nzbhydra2.iYOUR_DOMAIN_NAMEi images/hydra.png Unsorted Admin iFrame Y Jackett https://jackett.iYOUR_DOMAIN_NAMEi images/jackett.png Unsorted Admin iFrame Y Plex https://plex.iYOUR_DOMAIN_NAMEi images/plex.png Unsorted User iFrame Y Tautulli https://tautulli.iYOUR_DOMAIN_NAMEi images/tautulli.png Unsorted User iFrame Y Ombi https://ombi.iYOUR_DOMAIN_NAMEi images/ombi.png Unsorted User iFrame Y Overseerr https://overseerr.iYOUR_DOMAIN_NAMEi images/overseerr.png Unsorted User iFrame Y 
-
Note: If Sonarr or Radarr are lagging a lot, you may set it to a specific page in each. (e.g. Sonarr: https://sonarr.iYOUR_DOMAIN_NAMEi/calendar ; Radarr: https://radarr.iYOUR_DOMAIN_NAMEi/activity/history)
Homepage (Make you have Homepage ACTIVE in Tabs section)
-
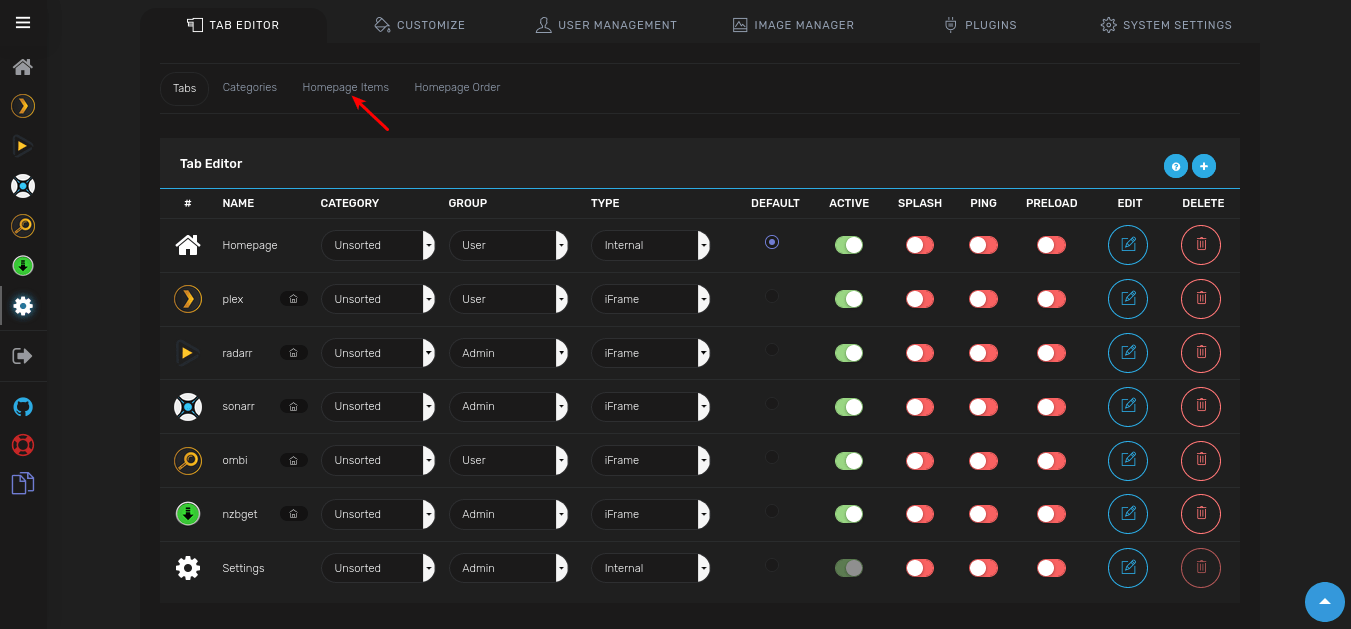
Click "Homepage Items" under the Tab Editor section, to be taken to the "Homepage Items" page.
-
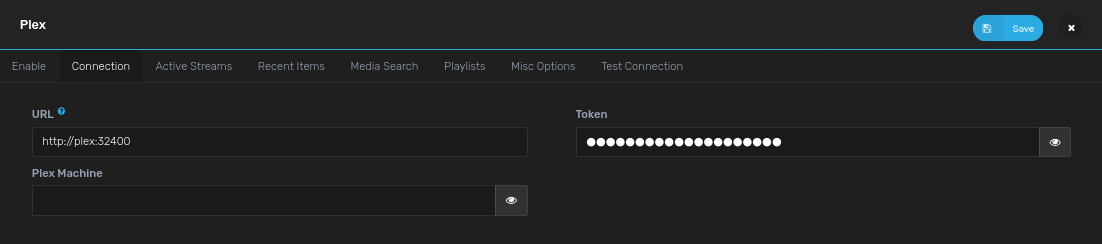
Click the Plex icon at the top.
-
You'll have to Enable it and verify the Minimum Authentication
-
Click on the Connection Tab and set "Plex URL":
http://plex:32400 -
Click "Retrieve" under Get Plex Token
- Click "Save" icon at the top right
-
Set your preferred options on the remaining tabs
-
Click "SAVE".
-
-
Click the Sonarr icon at the top.
-
Enable it.
-
On the Connections Tab, Set "Sonarr URL":
http://sonarr:8989 -
Set "Sonarr API Key": [Your Sonarr API Key|Install: Sonarr#9-retrieving-the-api-key]
-
Go over any other Miscellaneous Options on the next Tab and set your preferences.
-
Click "SAVE".

-
-
Click the Radarr icon at the top.
-
Enable it.
-
Set "Radarr URL":
http://radarr:7878 -
Set "Radarr API Key": [Your Radarr API Key|Install: Radarr#9-retrieving-the-api-key]
-
Go over any other Miscellaneous Options on the next Tab and set your preferences.
-
Click "SAVE".

-
-
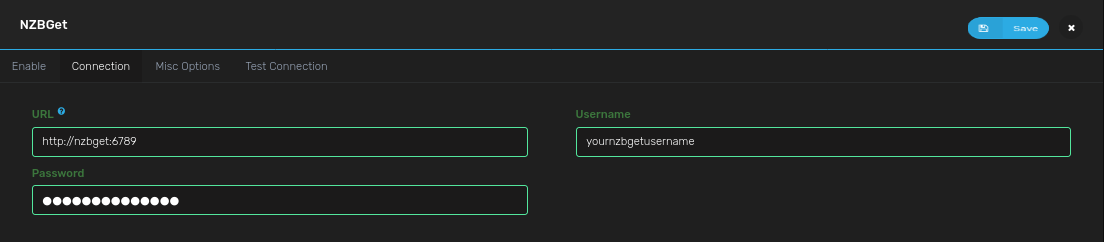
Click the NZBGet icon at the top.
-
Enable it.
-
Set "NZBGet URL":
http://nzbget:6789 -
For "Username" / "Password": fill in your NZBGet login (see [NZBGet|Install: NZBGet#2-setup])
-
Click "SAVE".
-
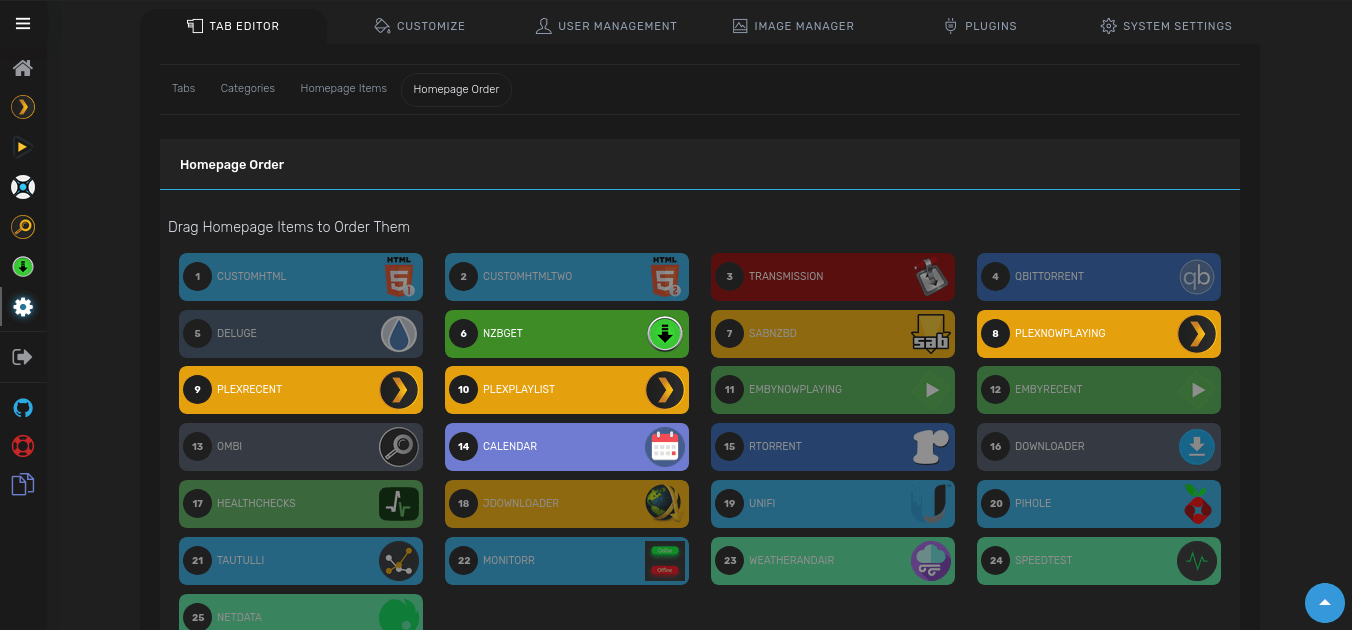
Homepage Order
-
This is where you organize the apps and other items and how they will appear on your Homepage. There's no right or wrong order so simply move things around and find out what works for you.
Any additional question please reach out to the Organizr team, either via their Discord Server or their subreddit
Next
Are you setting Saltbox up for the first time?
You're ready to explore Saltbox! You can start checking out community apps if you wish.
Role Defaults
Variables can be customized using the Inventory. (1)
-
Example override
organizr_name: "custom_value"Avoid overriding variables ending in
_defaultWhen overriding variables that end in
_default(likeorganizr_docker_envs_default), you replace the entire default configuration. Future updates that add new default values will not be applied to your setup, potentially breaking functionality.Instead, use the corresponding
_customvariable (likeorganizr_docker_envs_custom) to add your changes. Custom values are merged with defaults, ensuring you receive updates.
organizr_name
# Type: string
organizr_name: organizr
organizr_branch
# Type: string
organizr_branch: "v2-master"
organizr_role_web_subdomain
# Type: string
organizr_role_web_subdomain: "{{ organizr_name }}"
organizr_role_web_domain
# Type: string
organizr_role_web_domain: "{{ user.domain }}"
organizr_role_web_port
# Type: string
organizr_role_web_port: "80"
organizr_role_web_url
# Type: string
organizr_role_web_url: "{{ 'https://' + (lookup('role_var', '_web_subdomain', role='organizr') + '.' + lookup('role_var', '_web_domain', role='organizr')
                        if (lookup('role_var', '_web_subdomain', role='organizr') | length > 0)
                        else lookup('role_var', '_web_domain', role='organizr')) }}"
organizr_role_dns_record
# Type: string
organizr_role_dns_record: "{{ lookup('role_var', '_web_subdomain', role='organizr') }}"
organizr_role_dns_zone
# Type: string
organizr_role_dns_zone: "{{ lookup('role_var', '_web_domain', role='organizr') }}"
organizr_role_dns_proxy
# Type: bool (true/false)
organizr_role_dns_proxy: "{{ dns_proxied }}"
organizr_role_traefik_sso_middleware
# Type: string
organizr_role_traefik_sso_middleware: ""
organizr_role_traefik_middleware_default
# Type: string
organizr_role_traefik_middleware_default: "{{ traefik_default_middleware }}"
organizr_role_traefik_middleware_custom
# Type: string
organizr_role_traefik_middleware_custom: ""
organizr_role_traefik_certresolver
# Type: string
organizr_role_traefik_certresolver: "{{ traefik_default_certresolver }}"
organizr_role_traefik_enabled
# Type: bool (true/false)
organizr_role_traefik_enabled: true
organizr_role_traefik_api_enabled
# Type: bool (true/false)
organizr_role_traefik_api_enabled: false
organizr_role_traefik_api_endpoint
# Type: string
organizr_role_traefik_api_endpoint: ""
Container
organizr_role_docker_container
# Type: string
organizr_role_docker_container: "{{ organizr_name }}"
Image
organizr_role_docker_image_pull
# Type: bool (true/false)
organizr_role_docker_image_pull: true
organizr_role_docker_image_repo
# Type: string
organizr_role_docker_image_repo: "organizr/organizr"
organizr_role_docker_image_tag
# Type: string
organizr_role_docker_image_tag: "latest"
organizr_role_docker_image
# Type: string
organizr_role_docker_image: "{{ lookup('role_var', '_docker_image_repo', role='organizr') }}:{{ lookup('role_var', '_docker_image_tag', role='organizr') }}"
Envs
organizr_role_docker_envs_default
# Type: dict
organizr_role_docker_envs_default:
  PUID: "{{ uid }}"
  PGID: "{{ gid }}"
  TZ: "{{ tz }}"
  branch: "{{ organizr_branch }}"
organizr_role_docker_envs_custom
# Type: dict
organizr_role_docker_envs_custom: {}
Volumes
organizr_role_docker_volumes_default
# Type: list
organizr_role_docker_volumes_default:
  - "{{ organizr_role_paths_location }}:/config"
organizr_role_docker_volumes_custom
# Type: list
organizr_role_docker_volumes_custom: []
Hostname
organizr_role_docker_hostname
# Type: string
organizr_role_docker_hostname: "{{ organizr_name }}"
Networks
organizr_role_docker_networks_alias
# Type: string
organizr_role_docker_networks_alias: "{{ organizr_name }}"
organizr_role_docker_networks_default
# Type: list
organizr_role_docker_networks_default: []
organizr_role_docker_networks_custom
# Type: list
organizr_role_docker_networks_custom: []
Restart Policy
organizr_role_docker_restart_policy
# Type: string
organizr_role_docker_restart_policy: unless-stopped
State
organizr_role_docker_state
# Type: string
organizr_role_docker_state: started
The following advanced options are available via create_docker_container but are not defined in the role. See: docker_container module
Resource Limits
organizr_role_docker_blkio_weight
# Type: int
organizr_role_docker_blkio_weight:
organizr_role_docker_cpu_period
# Type: int
organizr_role_docker_cpu_period:
organizr_role_docker_cpu_quota
# Type: int
organizr_role_docker_cpu_quota:
organizr_role_docker_cpu_shares
# Type: int
organizr_role_docker_cpu_shares:
organizr_role_docker_cpus
# Type: string
organizr_role_docker_cpus:
organizr_role_docker_cpuset_cpus
# Type: string
organizr_role_docker_cpuset_cpus:
organizr_role_docker_cpuset_mems
# Type: string
organizr_role_docker_cpuset_mems:
organizr_role_docker_kernel_memory
# Type: string
organizr_role_docker_kernel_memory:
organizr_role_docker_memory
# Type: string
organizr_role_docker_memory:
organizr_role_docker_memory_reservation
# Type: string
organizr_role_docker_memory_reservation:
organizr_role_docker_memory_swap
# Type: string
organizr_role_docker_memory_swap:
organizr_role_docker_memory_swappiness
# Type: int
organizr_role_docker_memory_swappiness:
organizr_role_docker_shm_size
# Type: string
organizr_role_docker_shm_size:
Security & Devices
organizr_role_docker_cap_drop
# Type: list
organizr_role_docker_cap_drop:
organizr_role_docker_cgroupns_mode
# Type: string
organizr_role_docker_cgroupns_mode:
organizr_role_docker_device_cgroup_rules
# Type: list
organizr_role_docker_device_cgroup_rules:
organizr_role_docker_device_read_bps
# Type: list
organizr_role_docker_device_read_bps:
organizr_role_docker_device_read_iops
# Type: list
organizr_role_docker_device_read_iops:
organizr_role_docker_device_requests
# Type: list
organizr_role_docker_device_requests:
organizr_role_docker_device_write_bps
# Type: list
organizr_role_docker_device_write_bps:
organizr_role_docker_device_write_iops
# Type: list
organizr_role_docker_device_write_iops:
organizr_role_docker_devices
# Type: list
organizr_role_docker_devices:
organizr_role_docker_groups
# Type: list
organizr_role_docker_groups:
organizr_role_docker_privileged
# Type: bool (true/false)
organizr_role_docker_privileged:
organizr_role_docker_security_opts
# Type: list
organizr_role_docker_security_opts:
organizr_role_docker_user
# Type: string
organizr_role_docker_user:
organizr_role_docker_userns_mode
# Type: string
organizr_role_docker_userns_mode:
Networking
organizr_role_docker_dns_opts
# Type: list
organizr_role_docker_dns_opts:
organizr_role_docker_dns_search_domains
# Type: list
organizr_role_docker_dns_search_domains:
organizr_role_docker_dns_servers
# Type: list
organizr_role_docker_dns_servers:
organizr_role_docker_domainname
# Type: string
organizr_role_docker_domainname:
organizr_role_docker_exposed_ports
# Type: list
organizr_role_docker_exposed_ports:
organizr_role_docker_hosts
# Type: dict
organizr_role_docker_hosts:
organizr_role_docker_hosts_use_common
# Type: bool (true/false)
organizr_role_docker_hosts_use_common:
organizr_role_docker_ipc_mode
# Type: string
organizr_role_docker_ipc_mode:
organizr_role_docker_links
# Type: list
organizr_role_docker_links:
organizr_role_docker_network_mode
# Type: string
organizr_role_docker_network_mode:
organizr_role_docker_pid_mode
# Type: string
organizr_role_docker_pid_mode:
organizr_role_docker_ports
# Type: list
organizr_role_docker_ports:
organizr_role_docker_uts
# Type: string
organizr_role_docker_uts:
Storage
organizr_role_docker_keep_volumes
# Type: bool (true/false)
organizr_role_docker_keep_volumes:
organizr_role_docker_mounts
# Type: list
organizr_role_docker_mounts:
organizr_role_docker_storage_opts
# Type: dict
organizr_role_docker_storage_opts:
organizr_role_docker_tmpfs
# Type: list
organizr_role_docker_tmpfs:
organizr_role_docker_volume_driver
# Type: string
organizr_role_docker_volume_driver:
organizr_role_docker_volumes_from
# Type: list
organizr_role_docker_volumes_from:
organizr_role_docker_volumes_global
# Type: bool (true/false)
organizr_role_docker_volumes_global:
organizr_role_docker_working_dir
# Type: string
organizr_role_docker_working_dir:
Monitoring & Lifecycle
organizr_role_docker_auto_remove
# Type: bool (true/false)
organizr_role_docker_auto_remove:
organizr_role_docker_cleanup
# Type: bool (true/false)
organizr_role_docker_cleanup:
organizr_role_docker_force_kill
# Type: string
organizr_role_docker_force_kill:
organizr_role_docker_healthcheck
# Type: dict
organizr_role_docker_healthcheck:
organizr_role_docker_healthy_wait_timeout
# Type: int
organizr_role_docker_healthy_wait_timeout:
organizr_role_docker_init
# Type: bool (true/false)
organizr_role_docker_init:
organizr_role_docker_kill_signal
# Type: string
organizr_role_docker_kill_signal:
organizr_role_docker_log_driver
# Type: string
organizr_role_docker_log_driver:
organizr_role_docker_log_options
# Type: dict
organizr_role_docker_log_options:
organizr_role_docker_oom_killer
# Type: bool (true/false)
organizr_role_docker_oom_killer:
organizr_role_docker_oom_score_adj
# Type: int
organizr_role_docker_oom_score_adj:
organizr_role_docker_output_logs
# Type: bool (true/false)
organizr_role_docker_output_logs:
organizr_role_docker_paused
# Type: bool (true/false)
organizr_role_docker_paused:
organizr_role_docker_recreate
# Type: bool (true/false)
organizr_role_docker_recreate:
organizr_role_docker_restart_retries
# Type: int
organizr_role_docker_restart_retries:
organizr_role_docker_stop_signal
# Type: string
organizr_role_docker_stop_signal:
organizr_role_docker_stop_timeout
# Type: int
organizr_role_docker_stop_timeout:
Other Options
organizr_role_docker_capabilities
# Type: list
organizr_role_docker_capabilities:
organizr_role_docker_cgroup_parent
# Type: string
organizr_role_docker_cgroup_parent:
organizr_role_docker_commands
# Type: list
organizr_role_docker_commands:
organizr_role_docker_create_timeout
# Type: int
organizr_role_docker_create_timeout:
organizr_role_docker_entrypoint
# Type: string
organizr_role_docker_entrypoint:
organizr_role_docker_env_file
# Type: string
organizr_role_docker_env_file:
organizr_role_docker_labels
# Type: dict
organizr_role_docker_labels:
organizr_role_docker_labels_use_common
# Type: bool (true/false)
organizr_role_docker_labels_use_common:
organizr_role_docker_read_only
# Type: bool (true/false)
organizr_role_docker_read_only:
organizr_role_docker_runtime
# Type: string
organizr_role_docker_runtime:
organizr_role_docker_sysctls
# Type: list
organizr_role_docker_sysctls:
organizr_role_docker_ulimits
# Type: list
organizr_role_docker_ulimits:
organizr_role_autoheal_enabled
# Enable or disable Autoheal monitoring for the container created when deploying
# Type: bool (true/false)
organizr_role_autoheal_enabled: true
organizr_role_depends_on
# List of container dependencies that must be running before the container start
# Type: string
organizr_role_depends_on: ""
organizr_role_depends_on_delay
# Delay in seconds before starting the container after dependencies are ready
# Type: string (quoted number)
organizr_role_depends_on_delay: "0"
organizr_role_depends_on_healthchecks
# Enable healthcheck waiting for container dependencies
# Type: string ("true"/"false")
organizr_role_depends_on_healthchecks:
organizr_role_diun_enabled
# Enable or disable Diun update notifications for the container created when deploying
# Type: bool (true/false)
organizr_role_diun_enabled: true
organizr_role_dns_enabled
# Enable or disable automatic DNS record creation for the container
# Type: bool (true/false)
organizr_role_dns_enabled: true
organizr_role_docker_controller
# Enable or disable Saltbox Docker Controller management for the container
# Type: bool (true/false)
organizr_role_docker_controller: true
organizr_role_docker_networks_alias_custom
# Type: list
organizr_role_docker_networks_alias_custom:
organizr_role_docker_volumes_download
# Type: bool (true/false)
organizr_role_docker_volumes_download:
organizr_role_themepark_addons
# Type: string
organizr_role_themepark_addons:
organizr_role_themepark_app
# Type: string
organizr_role_themepark_app:
organizr_role_themepark_theme
# Type: string
organizr_role_themepark_theme:
organizr_role_traefik_api_middleware
# Type: string
organizr_role_traefik_api_middleware:
organizr_role_traefik_api_middleware_http
# Type: string
organizr_role_traefik_api_middleware_http:
organizr_role_traefik_autodetect_enabled
# Enable Traefik autodetect middleware for the container
# Type: bool (true/false)
organizr_role_traefik_autodetect_enabled: false
organizr_role_traefik_crowdsec_enabled
# Enable CrowdSec middleware for the container
# Type: bool (true/false)
organizr_role_traefik_crowdsec_enabled: false
organizr_role_traefik_error_pages_enabled
# Enable custom error pages middleware for the container
# Type: bool (true/false)
organizr_role_traefik_error_pages_enabled: false
organizr_role_traefik_gzip_enabled
# Enable gzip compression middleware for the container
# Type: bool (true/false)
organizr_role_traefik_gzip_enabled: false
organizr_role_traefik_middleware_http
# Type: string
organizr_role_traefik_middleware_http:
organizr_role_traefik_middleware_http_api_insecure
# Type: bool (true/false)
organizr_role_traefik_middleware_http_api_insecure:
organizr_role_traefik_middleware_http_insecure
# Type: bool (true/false)
organizr_role_traefik_middleware_http_insecure:
organizr_role_traefik_priority
# Type: string
organizr_role_traefik_priority:
organizr_role_traefik_robot_enabled
# Enable robots.txt middleware for the container
# Type: bool (true/false)
organizr_role_traefik_robot_enabled: true
organizr_role_traefik_tailscale_enabled
# Enable Tailscale-specific Traefik configuration for the container
# Type: bool (true/false)
organizr_role_traefik_tailscale_enabled: false
organizr_role_traefik_wildcard_enabled
# Enable wildcard certificate for the container
# Type: bool (true/false)
organizr_role_traefik_wildcard_enabled: true
organizr_role_web_api_http_port
# Type: string (quoted number)
organizr_role_web_api_http_port:
organizr_role_web_api_http_scheme
# Type: string ("http"/"https")
organizr_role_web_api_http_scheme:
organizr_role_web_api_http_serverstransport
# Type: dict/omit
organizr_role_web_api_http_serverstransport:
organizr_role_web_api_port
# Type: string (quoted number)
organizr_role_web_api_port:
organizr_role_web_api_scheme
# Type: string ("http"/"https")
organizr_role_web_api_scheme:
organizr_role_web_api_serverstransport
# Type: dict/omit
organizr_role_web_api_serverstransport:
organizr_role_web_fqdn_override
# Override the Traefik fully qualified domain name (FQDN) for the container
# Type: list
organizr_role_web_fqdn_override:
Example Override
organizr_role_web_fqdn_override:
  - "{{ traefik_host }}"
  - "organizr2.{{ user.domain }}"
  - "organizr.otherdomain.tld"
Note: Include {{ traefik_host }} to preserve the default FQDN alongside your custom entries
organizr_role_web_host_override
# Override the Traefik web host configuration for the container
# Type: string
organizr_role_web_host_override:
Example Override
organizr_role_web_host_override: "Host(`{{ traefik_host }}`) || Host(`{{ 'organizr2.' + user.domain }}`)"
Note: Use {{ traefik_host }} to include the default host configuration in your custom rule
organizr_role_web_http_port
# Type: string (quoted number)
organizr_role_web_http_port:
organizr_role_web_http_scheme
# Type: string ("http"/"https")
organizr_role_web_http_scheme:
organizr_role_web_http_serverstransport
# Type: dict/omit
organizr_role_web_http_serverstransport:
organizr_role_web_scheme
# URL scheme to use for web access to the container
# Type: string ("http"/"https")
organizr_role_web_scheme:
organizr_role_web_serverstransport
# Type: dict/omit
organizr_role_web_serverstransport: