Plex Media Server
| Description / name | Input element |
|---|---|
| Your domain name |
Overview
Plex Media Server is a software application that allows you to organize and stream your collection of movies, TV shows, music, and photos, from a central location to various devices.
Saltbox Setup Process
Opting for another media server solution?
Deployment
sb install plex
Usage
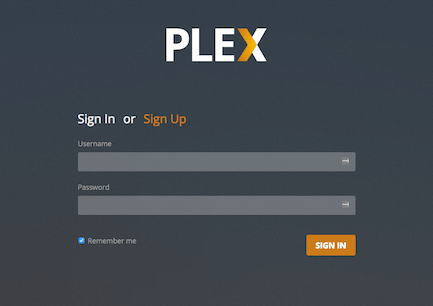
Visit https://plex.iYOUR_DOMAIN_NAMEi.
-
Login with your Plex account
Basics
Setup Wizard
-
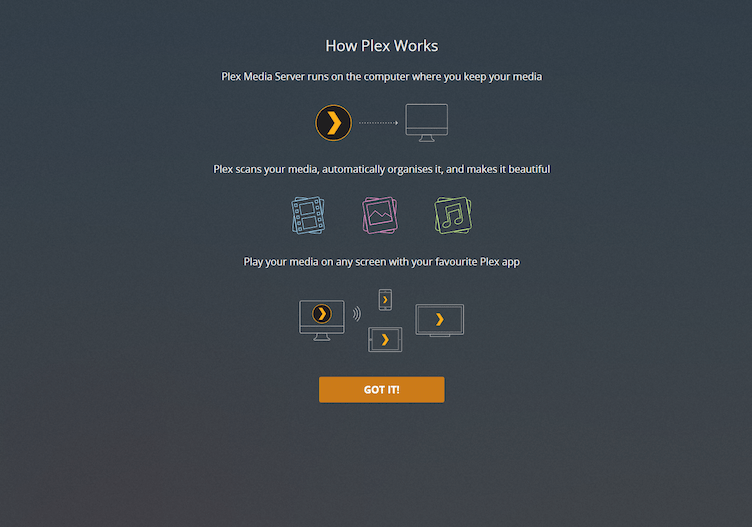
First time you log in, you will be presented with a welcome screen. Click "GOT IT!" to continue.
-
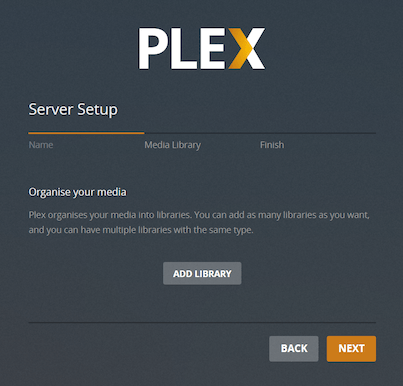
Next screen will show you your server, with a randomly generated name. Give it a friendly name and click "NEXT".

-
On the next screen, click "NEXT" (we will add Libraries later).
-
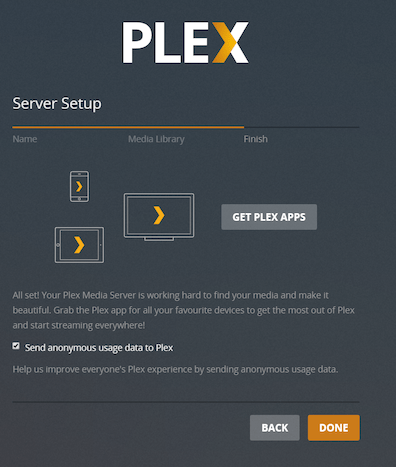
Click "DONE".
Settings
-
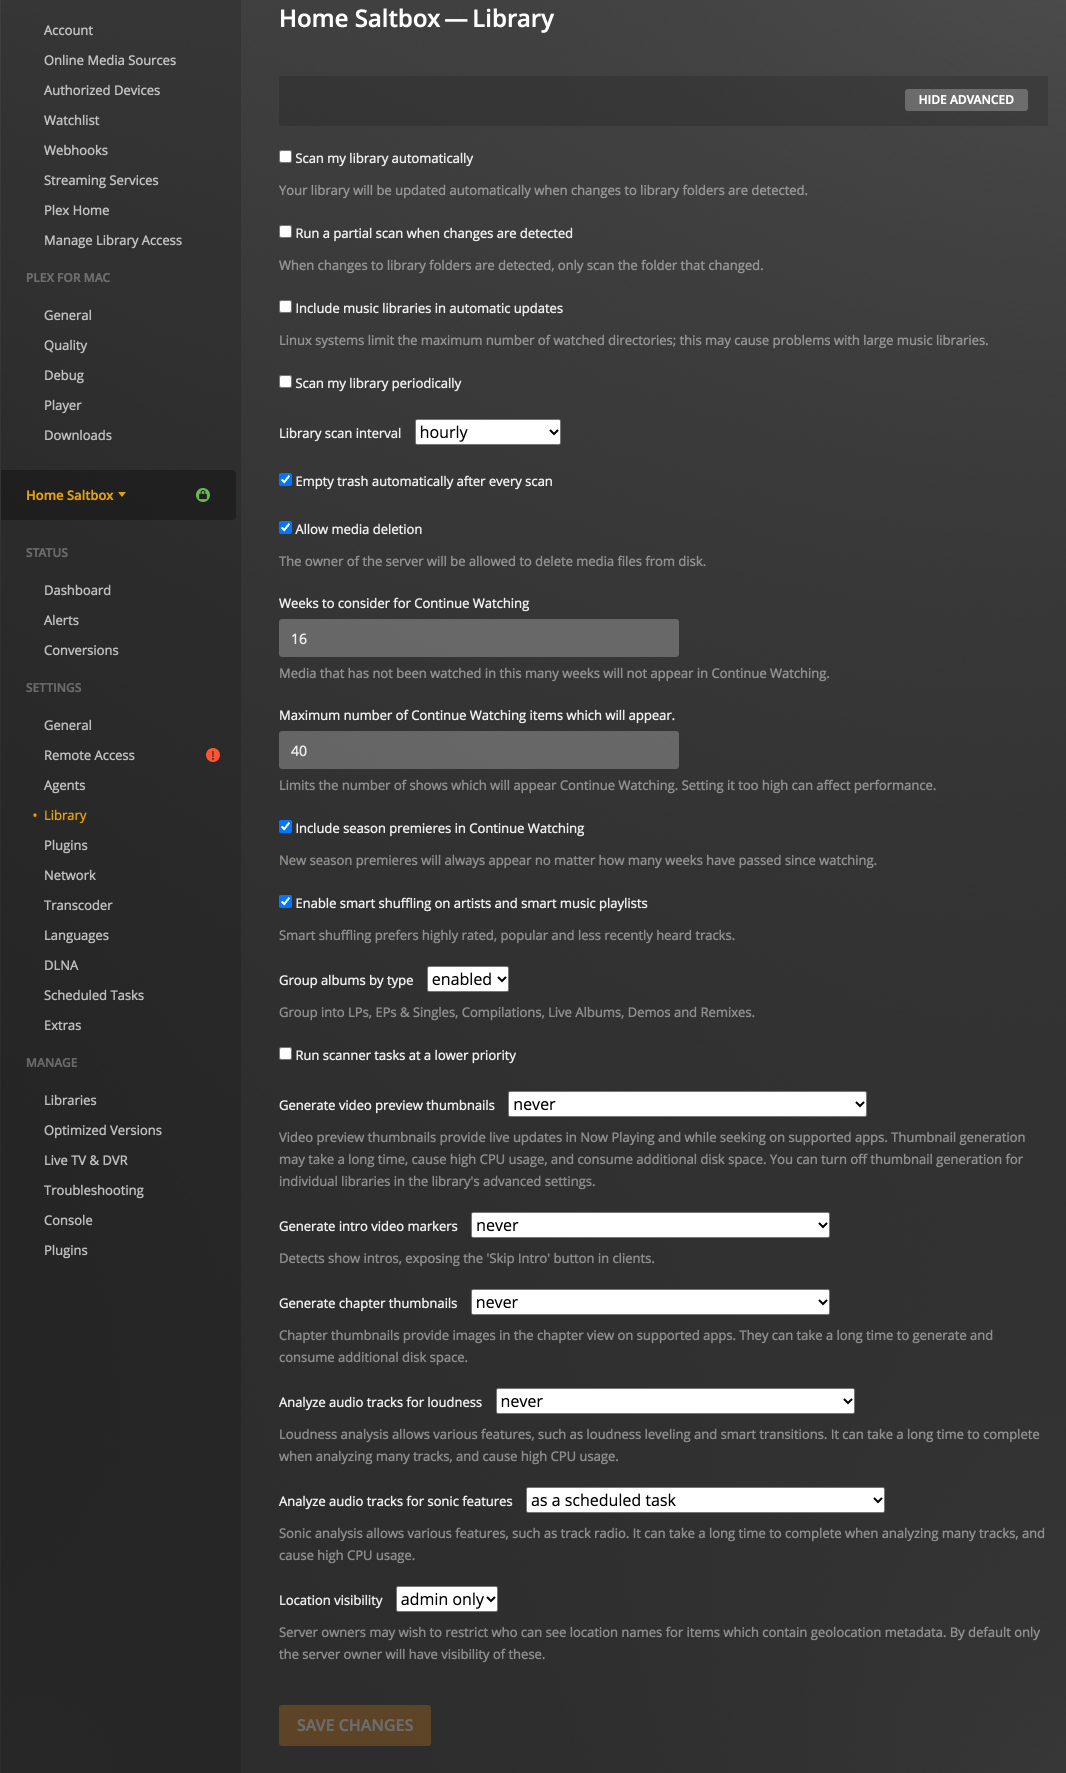
Click the Settings icon (top right) → "Server" (top) → "Library" (left). Click "SHOW ADVANCED" in the upper right.
-
Set the following:
-
"Empty trash automatically after every scan":
enabled-
THIS IS A CHANGE FROM WHEN Plex Autoscan WAS THE DEFAULT
-
Autoscan is now the default scan app, and it does not empty trash
-
-
"Allow media deletion":
enabled -
"Generate video preview thumbnails":
never -
"Generate intro video markers":
never -
"Generate chapter thumbnails":
never -
"Analyze audio tracks for loudness":
never -
"Analyze audio tracks for sonic features":
neverThe reasoning behind disabling these things is mostly related to Google Drive API usage, data transfer, and disk space. Accessing large portions of a given video file to generate thumbnails may generate large numbers of Google Drive API calls, and large amounts of data transfer. Either of these things may result in your account suffering one of the various types of 24-hour bans Google hands out, which may prevent your server from playing media at all. Also, storing these images will greatly inflate the size of
/opt/plex, which can affect the speed of backups, your ability to download, and anything else related to disk space usage. These are generally considered Bad Things, so the recommendation is to avoid the possibility by turning these options off.
-
-
Click "SAVE CHANGES".
-
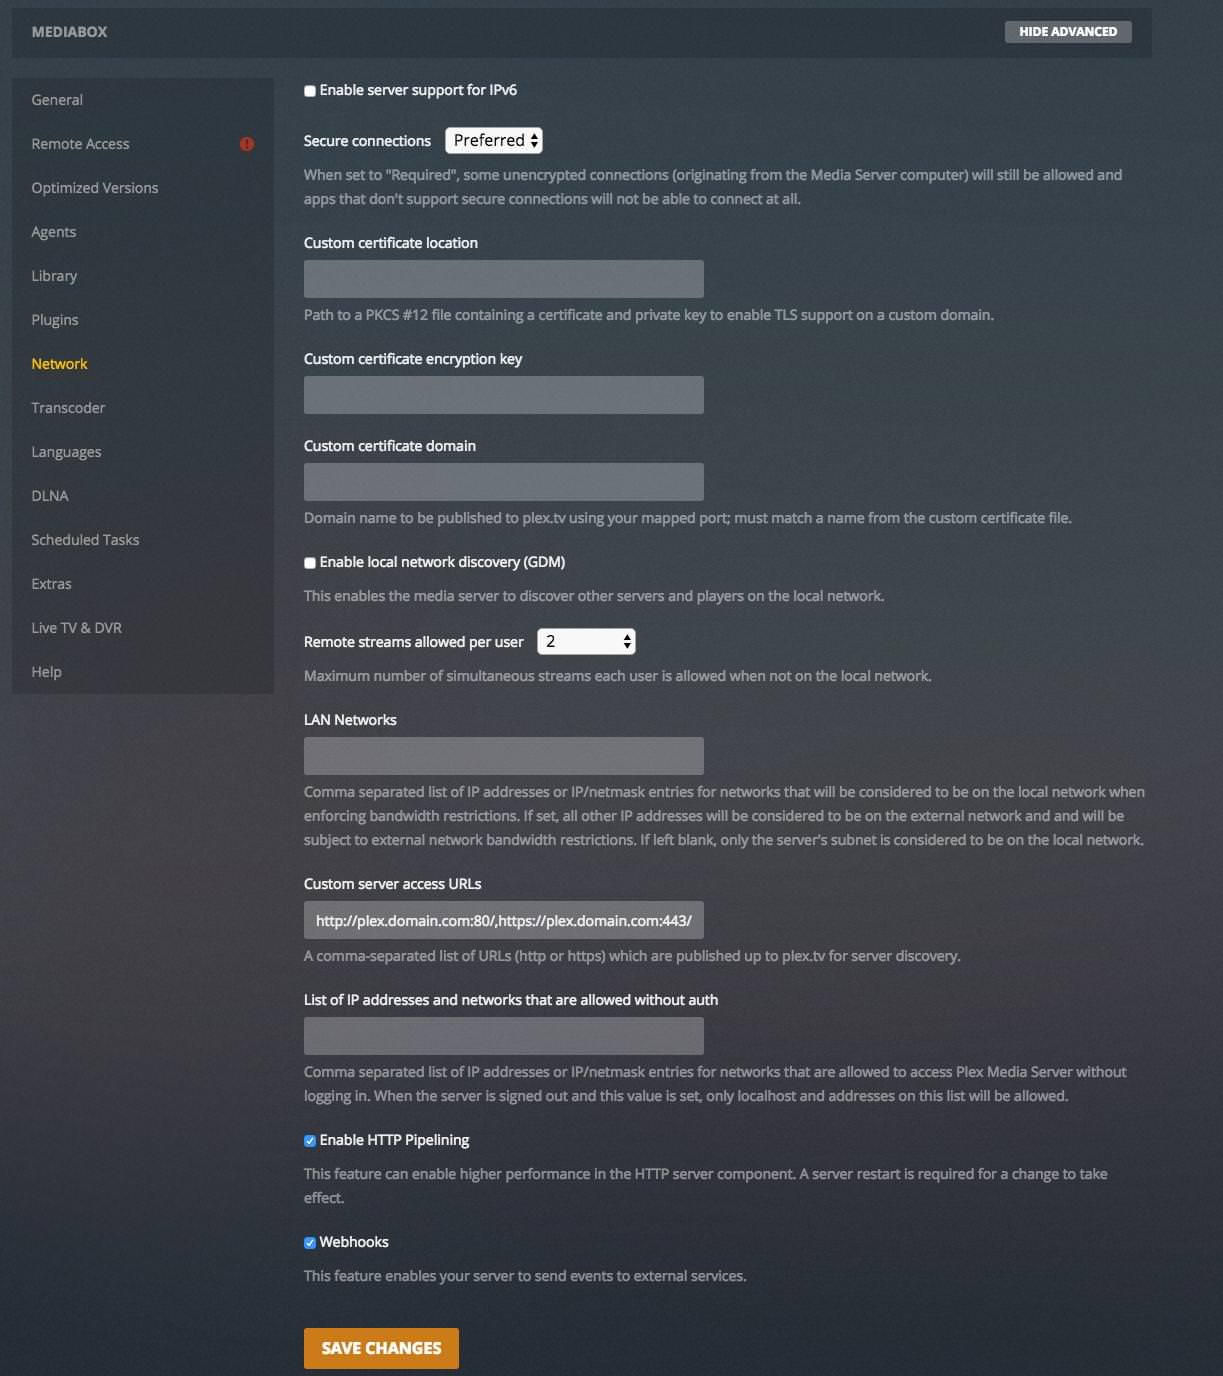
Click the Settings icon (top right) → "Server" (top) → "Network" (left).
-
Set the following:
-
"Secure Connections":
Preferred. -
"Enable local network discovery (GDM)":
disabled. -
"Remote streams allowed per user": your preference.
-
"Custom server access URLs" will be prefilled; do not edit this field as it will be overwritten.
-
-
Click "SAVE CHANGES".
-
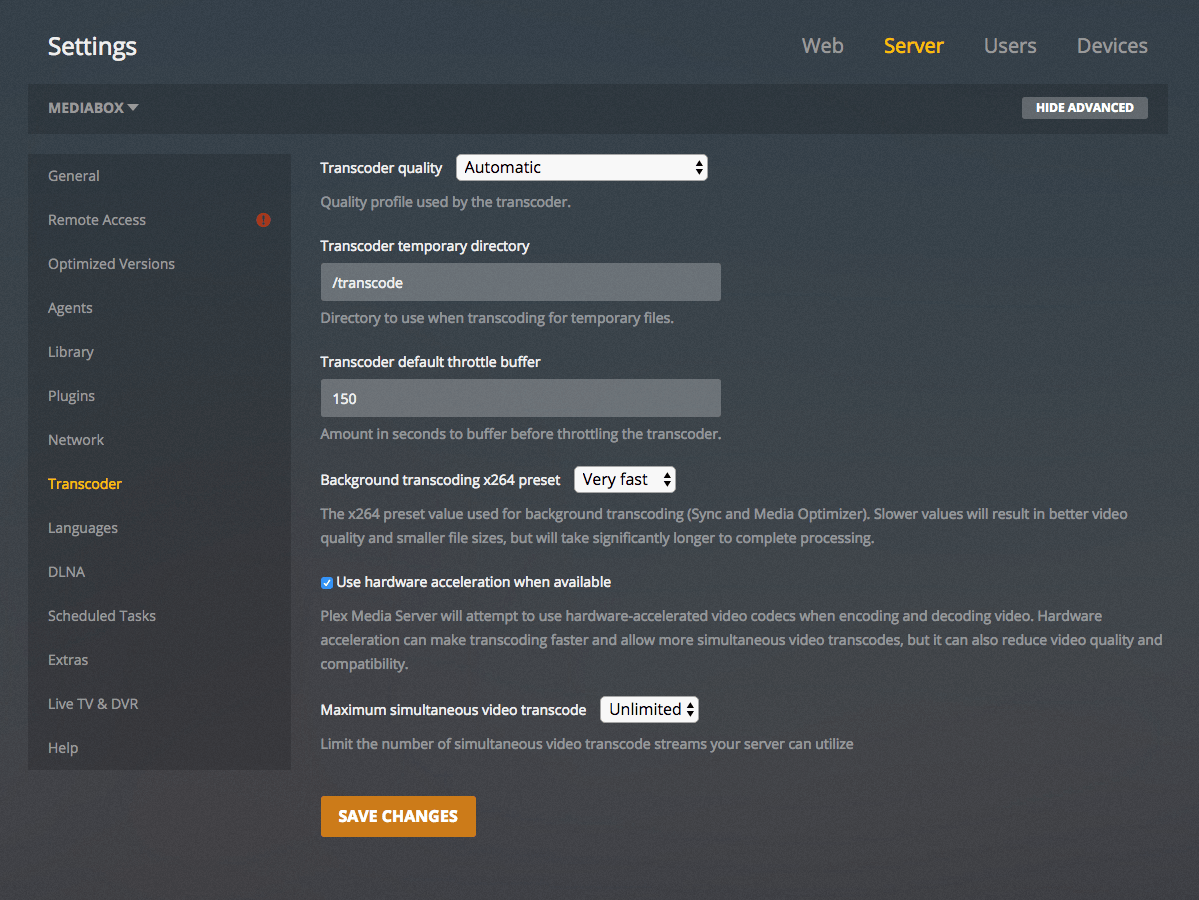
Click the Settings icon (top right) → "Server" (top) → "Transcoder" (left).
-
Set the following:
-
"Transcoder temporary directory":
/transcode -
"Transcoder default throttle buffer":
150 -
"Use hardware acceleration when available":
enabled -
"Maximum simultaneous video transcode":
unlimited
-
-
Click "SAVE CHANGES".
-
Click the Settings icon (top right) → "Server" (top) → "DLNA" (left).
-
Set the following:
-
"Enable the DLNA server":
disabled -
"DLNA server timeline reporting":
disabled
-
-
Click "SAVE CHANGES".

-
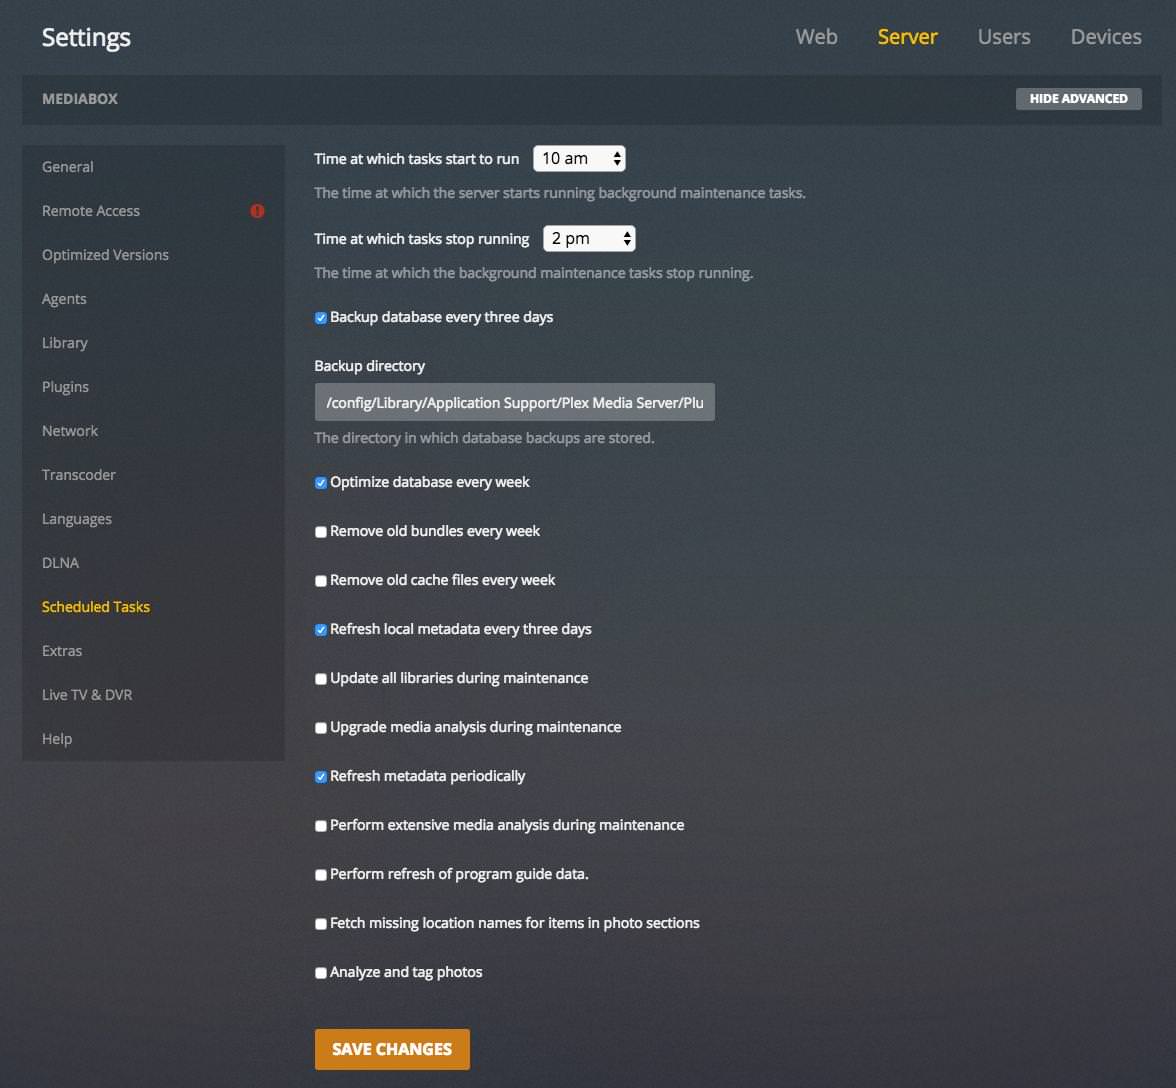
Click the Settings icon (top right) → "Server" (top) → "Scheduled Tasks" (left).
-
Set the following:
-
"Update all libraries during maintenance":
disabled -
"Upgrade media analysis during maintenance":
disabled -
"Perform extensive media analysis during maintenance":
disabled
-
-
Click "SAVE CHANGES".
-
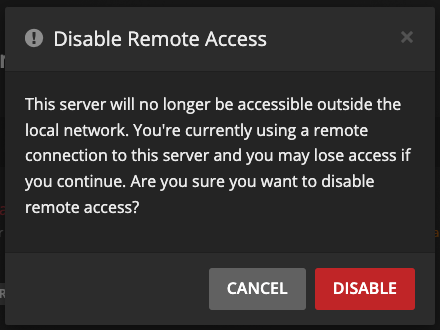
Click the Settings icon (top right) → "Server" (top) → "Remote Access" (left).
-
Click the grey button labelled "Disable Remote Access"
- You will see a scary warning. You are sure, so click the red "Disable" button.
Add Media Libraries
In this section, we will add two libraries: one for Movies and one for TV.
Note: If you would like to have custom Plex libraries (more than just a Movies and TV one), see Customizing Plex Libraries.
Libraries
-
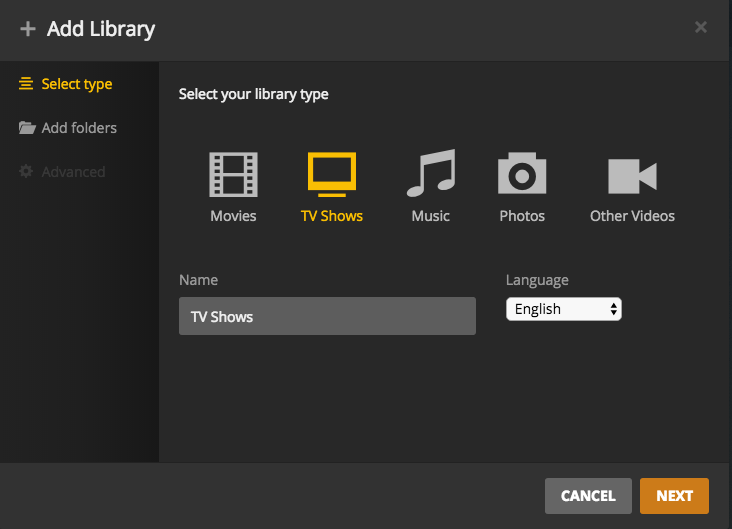
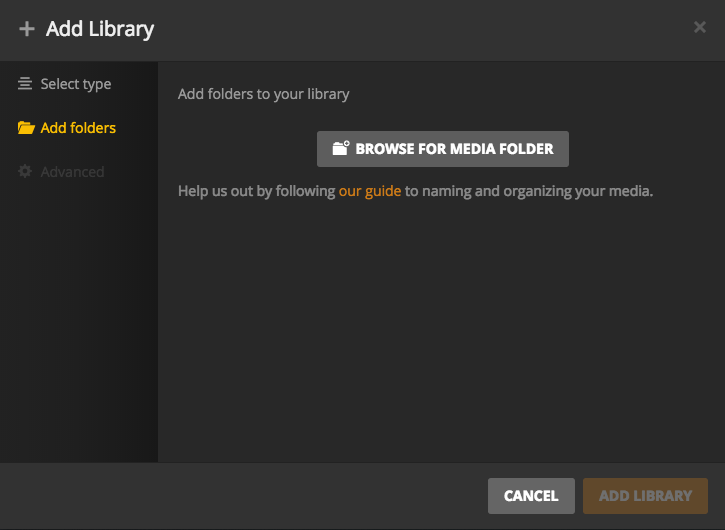
In the main Plex screen (Home icon on the top left), click "+" next to "LIBRARIES".

-
In the "Add Library" window, select "Movies" and click "NEXT".

-
Click "BROWSE FOR MEDIA FOLDER".

-
Navigate to
/mnt/unionfs/Media/Movies, and then click the "ADD" button.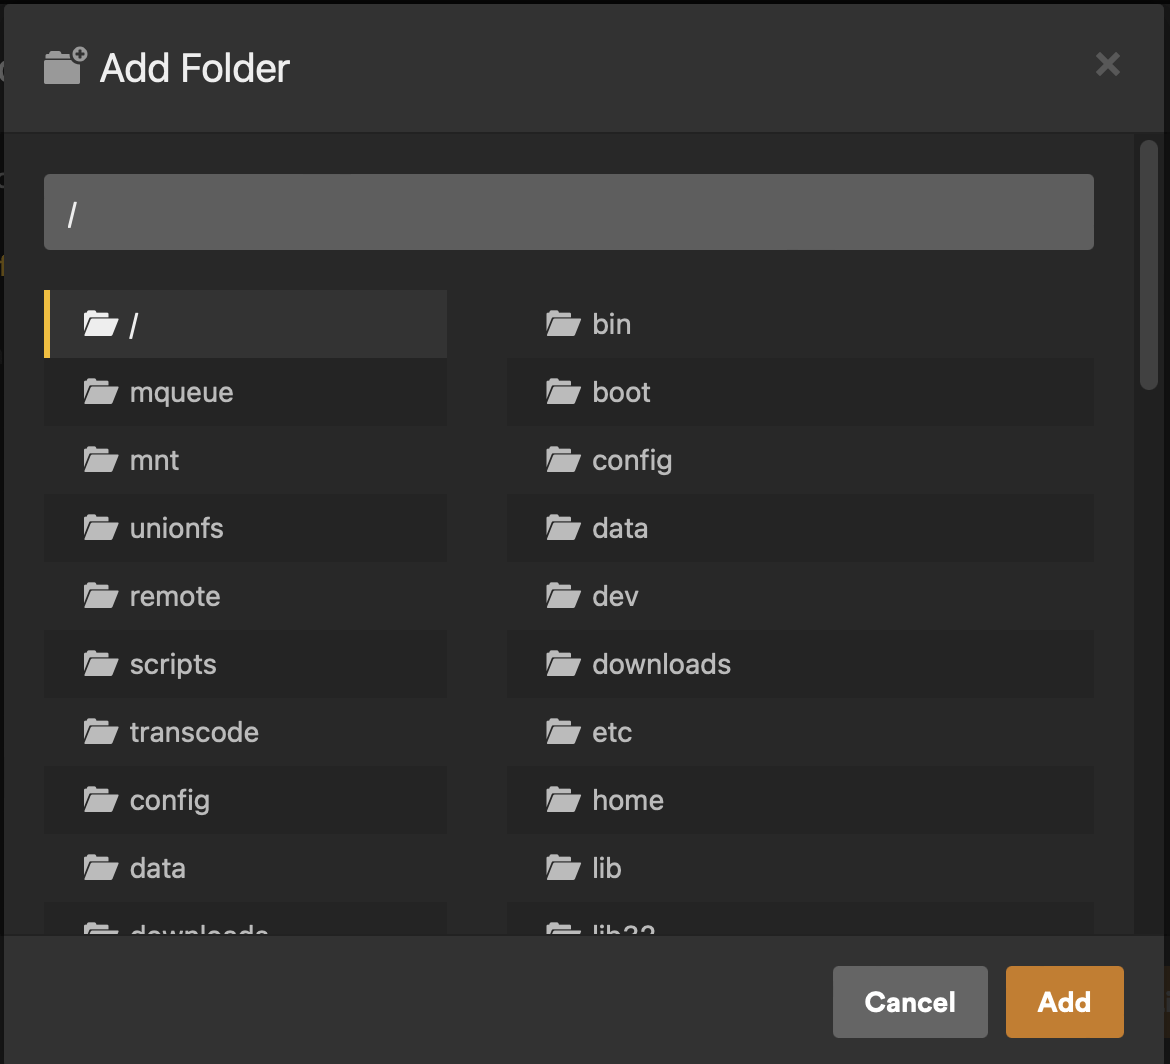
-
You will now see
/mnt/unionfs/Media/Moviesin the text box (don't click "ADD LIBRARY" yet).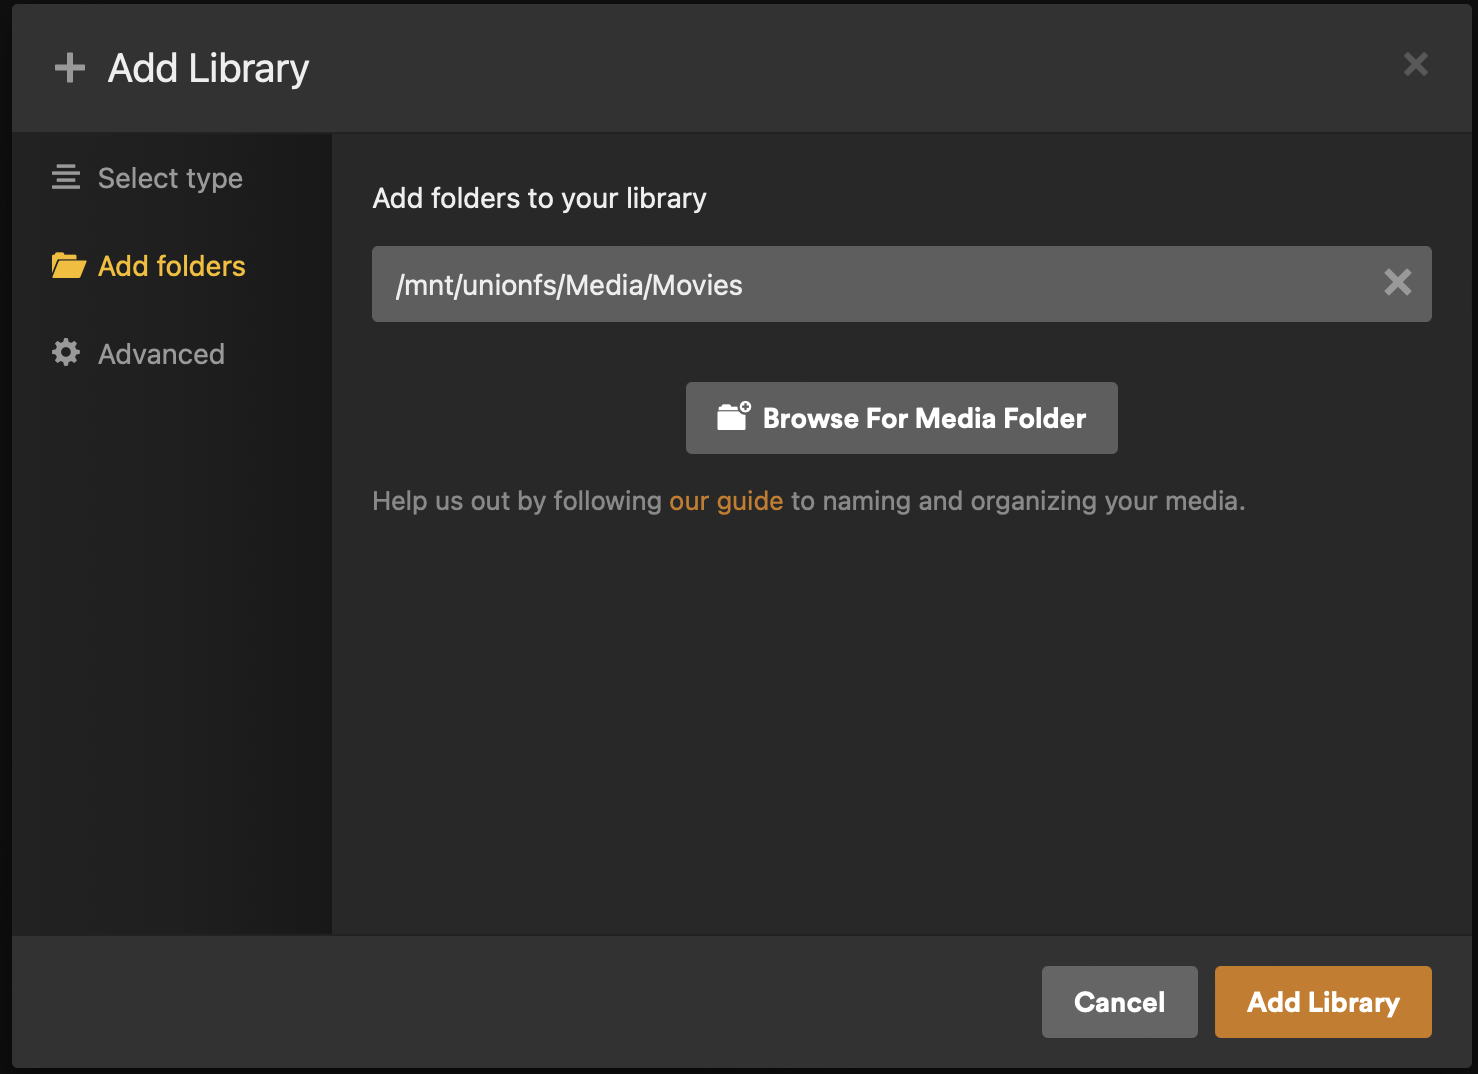
-
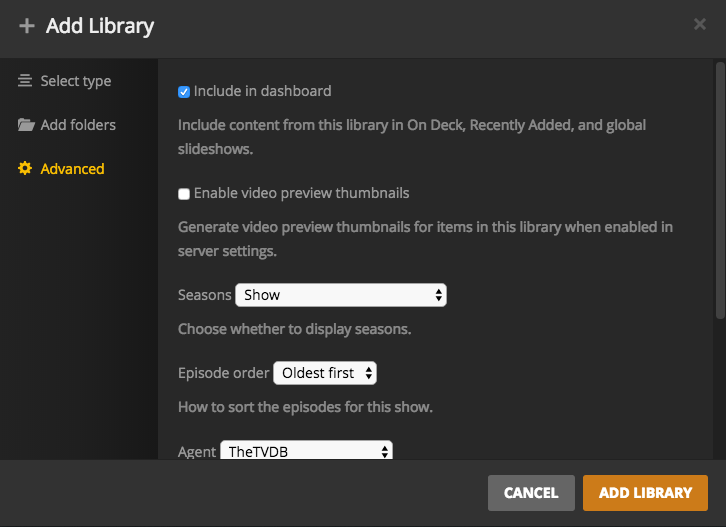
Click "Advanced" on the left.
-
Set the following:
-
"Enable Cinema Trailers":
disabled(optional) -
"Enable video preview thumbnails":
disabled -
"Find trailers and extras automatically (Plex Pass required)":
disabled(optional)
-
-
Click "ADD LIBRARY".

-
In the main Plex screen (Home icon on the top left), click "+" next to "LIBRARIES".

-
In the "Add Library" window, select "TV Shows" and click "NEXT".
-
Click "BROWSE FOR MEDIA FOLDER".
-
Navigate to
/mnt/unionfs/Media/TV, and then click the "ADD" button.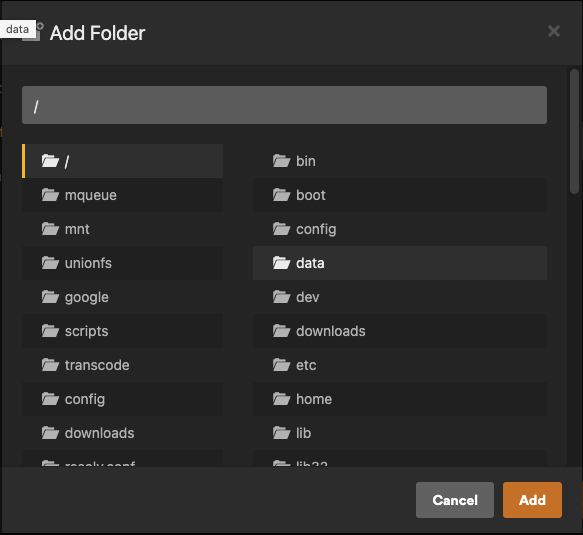
-
You will now see
/mnt/unionfs/Media/TVin the text box (don't click "ADD LIBRARY" yet).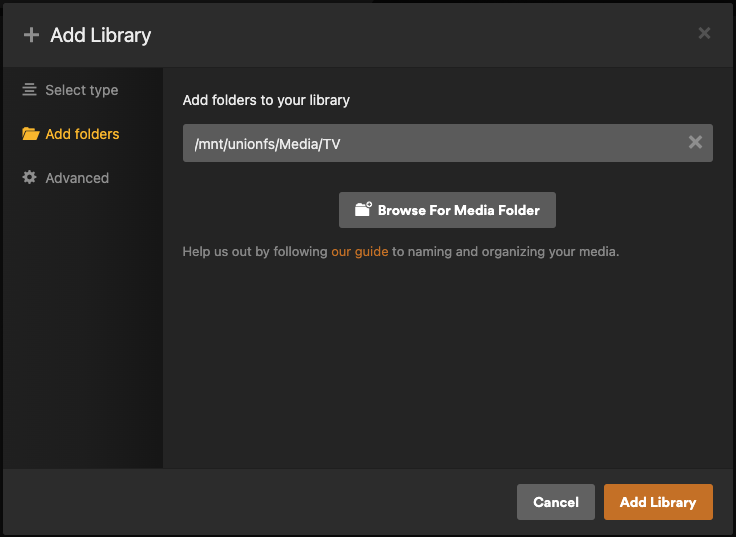
-
Click "Advanced" on the left.
-
Set the following:
-
"Enable video preview thumbnails":
disabled -
"Find trailers and extras automatically (Plex Pass required)":
disabled(optional)
-
-
Click "ADD LIBRARY".
Scan Media libraries
As mentioned in the Introduction page, Autoscan will automatically scan the media files into Plex as they are downloaded, but this will require the Plex database to not be completely empty. So for every new library that is added, a one-time, manual scan is required.
To do so:
-
Click the 3 dots next to a Plex library.
-
Select "Scan Library Files".
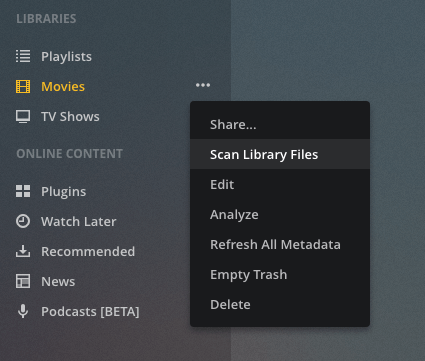
-
Repeat steps 1-2 for each library.
Next
Are you Setting Saltbox up for the first time?
Role Defaults
Variables can be customized using the Inventory. (1)
-
This role supports multiple instances via
plex_instances.Example override
plex_role_web_subdomain: "custom"Applies to all instances of plex
plex2_web_subdomain: "custom2"Applies to the instance named plex2
Avoid overriding variables ending in
_defaultWhen overriding variables that end in
_default(likeplex_docker_envs_default), you replace the entire default configuration. Future updates that add new default values will not be applied to your setup, potentially breaking functionality.Instead, use the corresponding
_customvariable (likeplex_docker_envs_custom) to add your changes. Custom values are merged with defaults, ensuring you receive updates.
plex_instances
# Type: list
plex_instances: ["plex"]
Example Override
# Type: list
plex_instances: ["plex", "plex2"]
plex_role_open_main_portsplex2_open_main_ports
# Do not enable globally if deploying multiple instances
# Type: bool (true/false)
plex_role_open_main_ports: false
# Do not enable globally if deploying multiple instances
# Type: bool (true/false)
plex2_open_main_ports: false
plex_role_open_local_portsplex2_open_local_ports
# Do not enable globally if deploying multiple instances
# Type: bool (true/false)
plex_role_open_local_ports: false
# Do not enable globally if deploying multiple instances
# Type: bool (true/false)
plex2_open_local_ports: false
plex_role_insecureplex2_insecure
# Disables Traefik's HTTP to HTTPS redirect for Plex
# Allows older clients with certificate issues to connect insecurely
# Type: bool (true/false)
plex_role_insecure: false
# Disables Traefik's HTTP to HTTPS redirect for Plex
# Allows older clients with certificate issues to connect insecurely
# Type: bool (true/false)
plex2_insecure: false
plex_role_lan_ipplex2_lan_ip
# Adds the IP specified here to the advertised URLs Plex broadcasts to clients
# Useful to avoid traffic going through your WAN when hairpin NAT is not available
# Type: string
plex_role_lan_ip: ""
# Adds the IP specified here to the advertised URLs Plex broadcasts to clients
# Useful to avoid traffic going through your WAN when hairpin NAT is not available
# Type: string
plex2_lan_ip: ""
plex_role_auth_token_proxyplex2_auth_token_proxy
# Example value "http://gluetun:8888"
# Type: string
plex_role_auth_token_proxy: ""
# Example value "http://gluetun:8888"
# Type: string
plex2_auth_token_proxy: ""
plex_role_web_subdomainplex2_web_subdomain
# Type: string
plex_role_web_subdomain: "{{ plex_name }}"
# Type: string
plex2_web_subdomain: "{{ plex_name }}"
plex_role_web_domainplex2_web_domain
# Type: string
plex_role_web_domain: "{{ user.domain }}"
# Type: string
plex2_web_domain: "{{ user.domain }}"
plex_role_web_portplex2_web_port
# Type: string
plex_role_web_port: "32400"
# Type: string
plex2_web_port: "32400"
plex_role_web_http_portplex2_web_http_port
# Type: string
plex_role_web_http_port: "32400"
# Type: string
plex2_web_http_port: "32400"
plex_role_web_urlplex2_web_url
# Type: string
plex_role_web_url: "{{ 'https://' + (lookup('role_var', '_web_subdomain', role='plex') + '.' + lookup('role_var', '_web_domain', role='plex')
                    if (lookup('role_var', '_web_subdomain', role='plex') | length > 0)
                    else lookup('role_var', '_web_domain', role='plex')) }}"
# Type: string
plex2_web_url: "{{ 'https://' + (lookup('role_var', '_web_subdomain', role='plex') + '.' + lookup('role_var', '_web_domain', role='plex')
                if (lookup('role_var', '_web_subdomain', role='plex') | length > 0)
                else lookup('role_var', '_web_domain', role='plex')) }}"
plex_role_web_insecure_urlplex2_web_insecure_url
# Type: string
plex_role_web_insecure_url: "{{ 'http://' + (lookup('role_var', '_web_subdomain', role='plex') + '.' + lookup('role_var', '_web_domain', role='plex')
                             if (lookup('role_var', '_web_subdomain', role='plex') | length > 0)
                             else lookup('role_var', '_web_domain', role='plex')) }}"
# Type: string
plex2_web_insecure_url: "{{ 'http://' + (lookup('role_var', '_web_subdomain', role='plex') + '.' + lookup('role_var', '_web_domain', role='plex')
                         if (lookup('role_var', '_web_subdomain', role='plex') | length > 0)
                         else lookup('role_var', '_web_domain', role='plex')) }}"
plex_role_dns_recordplex2_dns_record
# Type: string
plex_role_dns_record: "{{ lookup('role_var', '_web_subdomain', role='plex') }}"
# Type: string
plex2_dns_record: "{{ lookup('role_var', '_web_subdomain', role='plex') }}"
plex_role_dns_zoneplex2_dns_zone
# Type: string
plex_role_dns_zone: "{{ lookup('role_var', '_web_domain', role='plex') }}"
# Type: string
plex2_dns_zone: "{{ lookup('role_var', '_web_domain', role='plex') }}"
plex_role_dns_proxyplex2_dns_proxy
# Type: bool (true/false)
plex_role_dns_proxy: "{{ dns_proxied }}"
# Type: bool (true/false)
plex2_dns_proxy: "{{ dns_proxied }}"
plex_role_traefik_sso_middlewareplex2_traefik_sso_middleware
# Type: string
plex_role_traefik_sso_middleware: ""
# Type: string
plex2_traefik_sso_middleware: ""
plex_role_traefik_middleware_defaultplex2_traefik_middleware_default
# Type: string
plex_role_traefik_middleware_default: "{{ traefik_default_middleware
                                          + (',themepark-' + plex_name
                                            if (lookup('role_var', '_themepark_enabled', role='plex') and global_themepark_plugin_enabled)
                                            else '') }}"
# Type: string
plex2_traefik_middleware_default: "{{ traefik_default_middleware
                                      + (',themepark-' + plex_name
                                        if (lookup('role_var', '_themepark_enabled', role='plex') and global_themepark_plugin_enabled)
                                        else '') }}"
plex_role_traefik_middleware_customplex2_traefik_middleware_custom
# Type: string
plex_role_traefik_middleware_custom: ""
# Type: string
plex2_traefik_middleware_custom: ""
plex_role_traefik_certresolverplex2_traefik_certresolver
# Type: string
plex_role_traefik_certresolver: "{{ traefik_default_certresolver }}"
# Type: string
plex2_traefik_certresolver: "{{ traefik_default_certresolver }}"
plex_role_traefik_enabledplex2_traefik_enabled
# Type: bool (true/false)
plex_role_traefik_enabled: true
# Type: bool (true/false)
plex2_traefik_enabled: true
plex_role_traefik_api_enabledplex2_traefik_api_enabled
# Type: bool (true/false)
plex_role_traefik_api_enabled: false
# Type: bool (true/false)
plex2_traefik_api_enabled: false
plex_role_traefik_api_endpointplex2_traefik_api_endpoint
# Type: string
plex_role_traefik_api_endpoint: ""
# Type: string
plex2_traefik_api_endpoint: ""
plex_role_traefik_error_pages_enabledplex2_traefik_error_pages_enabled
# Type: bool (true/false)
plex_role_traefik_error_pages_enabled: false
# Type: bool (true/false)
plex2_traefik_error_pages_enabled: false
plex_role_traefik_gzip_enabledplex2_traefik_gzip_enabled
# Type: bool (true/false)
plex_role_traefik_gzip_enabled: false
# Type: bool (true/false)
plex2_traefik_gzip_enabled: false
plex_role_traefik_middleware_http_insecureplex2_traefik_middleware_http_insecure
# Type: string
plex_role_traefik_middleware_http_insecure: "{{ lookup('role_var', '_insecure', role='plex') | bool }}"
# Type: string
plex2_traefik_middleware_http_insecure: "{{ lookup('role_var', '_insecure', role='plex') | bool }}"
plex_role_web_serverstransportplex2_web_serverstransport
# Type: string
plex_role_web_serverstransport: "skipverify@file"
# Type: string
plex2_web_serverstransport: "skipverify@file"
plex_role_themepark_enabledplex2_themepark_enabled
# Type: bool (true/false)
plex_role_themepark_enabled: false
# Type: bool (true/false)
plex2_themepark_enabled: false
plex_role_themepark_themeplex2_themepark_theme
# Options can be found at https://docs.theme-park.dev/themes/plex/
# Type: string
plex_role_themepark_theme: "{{ global_themepark_theme }}"
# Options can be found at https://docs.theme-park.dev/themes/plex/
# Type: string
plex2_themepark_theme: "{{ global_themepark_theme }}"
plex_role_themepark_domainplex2_themepark_domain
# Allows you to override the url where CSS files can be found
# Type: string
plex_role_themepark_domain: "{{ global_themepark_domain }}"
# Allows you to override the url where CSS files can be found
# Type: string
plex2_themepark_domain: "{{ global_themepark_domain }}"
plex_role_themepark_addonsplex2_themepark_addons
# Options can be found at https://docs.theme-park.dev/themes/addons/
# Type: list
plex_role_themepark_addons: []
# Options can be found at https://docs.theme-park.dev/themes/addons/
# Type: list
plex2_themepark_addons: []
Container
plex_role_docker_containerplex2_docker_container
# Type: string
plex_role_docker_container: "{{ plex_name }}"
# Type: string
plex2_docker_container: "{{ plex_name }}"
Image
plex_role_docker_image_pullplex2_docker_image_pull
# Type: bool (true/false)
plex_role_docker_image_pull: true
# Type: bool (true/false)
plex2_docker_image_pull: true
plex_role_docker_image_repoplex2_docker_image_repo
# Type: string
plex_role_docker_image_repo: "plexinc/pms-docker"
# Type: string
plex2_docker_image_repo: "plexinc/pms-docker"
plex_role_docker_image_tagplex2_docker_image_tag
# Type: string
plex_role_docker_image_tag: "latest"
# Type: string
plex2_docker_image_tag: "latest"
plex_role_docker_imageplex2_docker_image
# Type: string
plex_role_docker_image: "{{ lookup('role_var', '_docker_image_repo', role='plex') }}:{{ lookup('role_var', '_docker_image_tag', role='plex') }}"
# Type: string
plex2_docker_image: "{{ lookup('role_var', '_docker_image_repo', role='plex') }}:{{ lookup('role_var', '_docker_image_tag', role='plex') }}"
Ports
plex_role_docker_ports_32400plex2_docker_ports_32400
# Type: string
plex_role_docker_ports_32400: "{{ port_lookup_32400.meta.port
                               if (port_lookup_32400.meta.port is defined) and (port_lookup_32400.meta.port | trim | length > 0)
                               else '32400' }}"
# Type: string
plex2_docker_ports_32400: "{{ port_lookup_32400.meta.port
                           if (port_lookup_32400.meta.port is defined) and (port_lookup_32400.meta.port | trim | length > 0)
                           else '32400' }}"
plex_role_docker_ports_defaultplex2_docker_ports_default
# Type: list
plex_role_docker_ports_default: []
# Type: list
plex2_docker_ports_default: []
plex_role_docker_ports_customplex2_docker_ports_custom
# Type: list
plex_role_docker_ports_custom: []
# Type: list
plex2_docker_ports_custom: []
Envs
plex_role_docker_envs_advertise_ip_urlplex2_docker_envs_advertise_ip_url
# Type: string
plex_role_docker_envs_advertise_ip_url: "{{ lookup('role_var', '_web_url', role='plex') + ':443,' + lookup('role_var', '_web_insecure_url', role='plex') + ':80'
                                         if lookup('role_var', '_insecure', role='plex')
                                         else lookup('role_var', '_web_url', role='plex') + ':443' }}"
# Type: string
plex2_docker_envs_advertise_ip_url: "{{ lookup('role_var', '_web_url', role='plex') + ':443,' + lookup('role_var', '_web_insecure_url', role='plex') + ':80'
                                     if lookup('role_var', '_insecure', role='plex')
                                     else lookup('role_var', '_web_url', role='plex') + ':443' }}"
plex_role_docker_envs_advertise_ipplex2_docker_envs_advertise_ip
# Type: string
plex_role_docker_envs_advertise_ip: "{{ 'http://' + lookup('role_var', '_lan_ip', role='plex') + ':32400,' + lookup('role_var', '_docker_envs_advertise_ip_url', role='plex')
                                     if (lookup('role_var', '_lan_ip', role='plex') | length > 0) and lookup('role_var', '_open_main_ports', role='plex')
                                     else lookup('role_var', '_docker_envs_advertise_ip_url', role='plex') }}"
# Type: string
plex2_docker_envs_advertise_ip: "{{ 'http://' + lookup('role_var', '_lan_ip', role='plex') + ':32400,' + lookup('role_var', '_docker_envs_advertise_ip_url', role='plex')
                                 if (lookup('role_var', '_lan_ip', role='plex') | length > 0) and lookup('role_var', '_open_main_ports', role='plex')
                                 else lookup('role_var', '_docker_envs_advertise_ip_url', role='plex') }}"
plex_role_docker_envs_defaultplex2_docker_envs_default
# Type: dict
plex_role_docker_envs_default:
  PLEX_UID: "{{ uid }}"
  PLEX_GID: "{{ gid }}"
  PLEX_CLAIM: "{{ (plex_claim_code) | default(omit) }}"
  CHANGE_CONFIG_DIR_OWNERSHIP: "false"
  TZ: "{{ tz }}"
  ADVERTISE_IP: "{{ lookup('role_var', '_docker_envs_advertise_ip', role='plex') }}"
# Type: dict
plex2_docker_envs_default:
  PLEX_UID: "{{ uid }}"
  PLEX_GID: "{{ gid }}"
  PLEX_CLAIM: "{{ (plex_claim_code) | default(omit) }}"
  CHANGE_CONFIG_DIR_OWNERSHIP: "false"
  TZ: "{{ tz }}"
  ADVERTISE_IP: "{{ lookup('role_var', '_docker_envs_advertise_ip', role='plex') }}"
plex_role_docker_envs_customplex2_docker_envs_custom
# Type: dict
plex_role_docker_envs_custom: {}
# Type: dict
plex2_docker_envs_custom: {}
Volumes
plex_role_docker_volumes_defaultplex2_docker_volumes_default
# Type: list
plex_role_docker_volumes_default:
  - "{{ plex_role_paths_location }}:/config"
  - "{{ server_appdata_path }}/scripts:/scripts"
  - "/dev/shm:/dev/shm"
  - "{{ plex_role_paths_transcodes_location }}:/transcode"
# Type: list
plex2_docker_volumes_default:
  - "{{ plex_role_paths_location }}:/config"
  - "{{ server_appdata_path }}/scripts:/scripts"
  - "/dev/shm:/dev/shm"
  - "{{ plex_role_paths_transcodes_location }}:/transcode"
plex_role_docker_volumes_legacyplex2_docker_volumes_legacy
# Type: list
plex_role_docker_volumes_legacy:
  - "/mnt/unionfs/Media:/data"
# Type: list
plex2_docker_volumes_legacy:
  - "/mnt/unionfs/Media:/data"
plex_role_docker_volumes_customplex2_docker_volumes_custom
# Type: list
plex_role_docker_volumes_custom: []
# Type: list
plex2_docker_volumes_custom: []
Mounts
plex_role_docker_mounts_defaultplex2_docker_mounts_default
# Type: list
plex_role_docker_mounts_default:
  - target: /tmp
    type: tmpfs
# Type: list
plex2_docker_mounts_default:
  - target: /tmp
    type: tmpfs
plex_role_docker_mounts_customplex2_docker_mounts_custom
# Type: list
plex_role_docker_mounts_custom: []
# Type: list
plex2_docker_mounts_custom: []
Hosts
plex_role_docker_hosts_defaultplex2_docker_hosts_default
# Type: dict
plex_role_docker_hosts_default:
  metric.plex.tv: "{{ ip_address_localhost }}"
  metrics.plex.tv: "{{ ip_address_localhost }}"
  analytics.plex.tv: "{{ ip_address_localhost }}"
# Type: dict
plex2_docker_hosts_default:
  metric.plex.tv: "{{ ip_address_localhost }}"
  metrics.plex.tv: "{{ ip_address_localhost }}"
  analytics.plex.tv: "{{ ip_address_localhost }}"
plex_role_docker_hosts_customplex2_docker_hosts_custom
# Type: dict
plex_role_docker_hosts_custom: {}
# Type: dict
plex2_docker_hosts_custom: {}
Labels
plex_role_docker_labels_customplex2_docker_labels_custom
# Type: dict
plex_role_docker_labels_custom: {}
# Type: dict
plex2_docker_labels_custom: {}
Hostname
plex_role_docker_hostnameplex2_docker_hostname
# Type: string
plex_role_docker_hostname: "{{ plex_name }}"
# Type: string
plex2_docker_hostname: "{{ plex_name }}"
Networks
plex_role_docker_networks_aliasplex2_docker_networks_alias
# Type: string
plex_role_docker_networks_alias: "{{ plex_name }}"
# Type: string
plex2_docker_networks_alias: "{{ plex_name }}"
plex_role_docker_networks_defaultplex2_docker_networks_default
# Type: list
plex_role_docker_networks_default: []
# Type: list
plex2_docker_networks_default: []
plex_role_docker_networks_customplex2_docker_networks_custom
# Type: list
plex_role_docker_networks_custom: []
# Type: list
plex2_docker_networks_custom: []
Restart Policy
plex_role_docker_restart_policyplex2_docker_restart_policy
# Type: string
plex_role_docker_restart_policy: unless-stopped
# Type: string
plex2_docker_restart_policy: unless-stopped
State
plex_role_docker_stateplex2_docker_state
# Type: string
plex_role_docker_state: started
# Type: string
plex2_docker_state: started
The following advanced options are available via create_docker_container but are not defined in the role. See: docker_container module
Resource Limits
plex_role_docker_blkio_weightplex2_docker_blkio_weight
# Type: int
plex_role_docker_blkio_weight:
# Type: int
plex2_docker_blkio_weight:
plex_role_docker_cpu_periodplex2_docker_cpu_period
# Type: int
plex_role_docker_cpu_period:
# Type: int
plex2_docker_cpu_period:
plex_role_docker_cpu_quotaplex2_docker_cpu_quota
# Type: int
plex_role_docker_cpu_quota:
# Type: int
plex2_docker_cpu_quota:
plex_role_docker_cpu_sharesplex2_docker_cpu_shares
# Type: int
plex_role_docker_cpu_shares:
# Type: int
plex2_docker_cpu_shares:
plex_role_docker_cpusplex2_docker_cpus
# Type: string
plex_role_docker_cpus:
# Type: string
plex2_docker_cpus:
plex_role_docker_cpuset_cpusplex2_docker_cpuset_cpus
# Type: string
plex_role_docker_cpuset_cpus:
# Type: string
plex2_docker_cpuset_cpus:
plex_role_docker_cpuset_memsplex2_docker_cpuset_mems
# Type: string
plex_role_docker_cpuset_mems:
# Type: string
plex2_docker_cpuset_mems:
plex_role_docker_kernel_memoryplex2_docker_kernel_memory
# Type: string
plex_role_docker_kernel_memory:
# Type: string
plex2_docker_kernel_memory:
plex_role_docker_memoryplex2_docker_memory
# Type: string
plex_role_docker_memory:
# Type: string
plex2_docker_memory:
plex_role_docker_memory_reservationplex2_docker_memory_reservation
# Type: string
plex_role_docker_memory_reservation:
# Type: string
plex2_docker_memory_reservation:
plex_role_docker_memory_swapplex2_docker_memory_swap
# Type: string
plex_role_docker_memory_swap:
# Type: string
plex2_docker_memory_swap:
plex_role_docker_memory_swappinessplex2_docker_memory_swappiness
# Type: int
plex_role_docker_memory_swappiness:
# Type: int
plex2_docker_memory_swappiness:
plex_role_docker_shm_sizeplex2_docker_shm_size
# Type: string
plex_role_docker_shm_size:
# Type: string
plex2_docker_shm_size:
Security & Devices
plex_role_docker_cap_dropplex2_docker_cap_drop
# Type: list
plex_role_docker_cap_drop:
# Type: list
plex2_docker_cap_drop:
plex_role_docker_cgroupns_modeplex2_docker_cgroupns_mode
# Type: string
plex_role_docker_cgroupns_mode:
# Type: string
plex2_docker_cgroupns_mode:
plex_role_docker_device_cgroup_rulesplex2_docker_device_cgroup_rules
# Type: list
plex_role_docker_device_cgroup_rules:
# Type: list
plex2_docker_device_cgroup_rules:
plex_role_docker_device_read_bpsplex2_docker_device_read_bps
# Type: list
plex_role_docker_device_read_bps:
# Type: list
plex2_docker_device_read_bps:
plex_role_docker_device_read_iopsplex2_docker_device_read_iops
# Type: list
plex_role_docker_device_read_iops:
# Type: list
plex2_docker_device_read_iops:
plex_role_docker_device_requestsplex2_docker_device_requests
# Type: list
plex_role_docker_device_requests:
# Type: list
plex2_docker_device_requests:
plex_role_docker_device_write_bpsplex2_docker_device_write_bps
# Type: list
plex_role_docker_device_write_bps:
# Type: list
plex2_docker_device_write_bps:
plex_role_docker_device_write_iopsplex2_docker_device_write_iops
# Type: list
plex_role_docker_device_write_iops:
# Type: list
plex2_docker_device_write_iops:
plex_role_docker_devicesplex2_docker_devices
# Type: list
plex_role_docker_devices:
# Type: list
plex2_docker_devices:
plex_role_docker_groupsplex2_docker_groups
# Type: list
plex_role_docker_groups:
# Type: list
plex2_docker_groups:
plex_role_docker_privilegedplex2_docker_privileged
# Type: bool (true/false)
plex_role_docker_privileged:
# Type: bool (true/false)
plex2_docker_privileged:
plex_role_docker_security_optsplex2_docker_security_opts
# Type: list
plex_role_docker_security_opts:
# Type: list
plex2_docker_security_opts:
plex_role_docker_userplex2_docker_user
# Type: string
plex_role_docker_user:
# Type: string
plex2_docker_user:
plex_role_docker_userns_modeplex2_docker_userns_mode
# Type: string
plex_role_docker_userns_mode:
# Type: string
plex2_docker_userns_mode:
Networking
plex_role_docker_dns_optsplex2_docker_dns_opts
# Type: list
plex_role_docker_dns_opts:
# Type: list
plex2_docker_dns_opts:
plex_role_docker_dns_search_domainsplex2_docker_dns_search_domains
# Type: list
plex_role_docker_dns_search_domains:
# Type: list
plex2_docker_dns_search_domains:
plex_role_docker_dns_serversplex2_docker_dns_servers
# Type: list
plex_role_docker_dns_servers:
# Type: list
plex2_docker_dns_servers:
plex_role_docker_domainnameplex2_docker_domainname
# Type: string
plex_role_docker_domainname:
# Type: string
plex2_docker_domainname:
plex_role_docker_exposed_portsplex2_docker_exposed_ports
# Type: list
plex_role_docker_exposed_ports:
# Type: list
plex2_docker_exposed_ports:
plex_role_docker_hosts_use_commonplex2_docker_hosts_use_common
# Type: bool (true/false)
plex_role_docker_hosts_use_common:
# Type: bool (true/false)
plex2_docker_hosts_use_common:
plex_role_docker_ipc_modeplex2_docker_ipc_mode
# Type: string
plex_role_docker_ipc_mode:
# Type: string
plex2_docker_ipc_mode:
plex_role_docker_linksplex2_docker_links
# Type: list
plex_role_docker_links:
# Type: list
plex2_docker_links:
plex_role_docker_network_modeplex2_docker_network_mode
# Type: string
plex_role_docker_network_mode:
# Type: string
plex2_docker_network_mode:
plex_role_docker_pid_modeplex2_docker_pid_mode
# Type: string
plex_role_docker_pid_mode:
# Type: string
plex2_docker_pid_mode:
plex_role_docker_utsplex2_docker_uts
# Type: string
plex_role_docker_uts:
# Type: string
plex2_docker_uts:
Storage
plex_role_docker_keep_volumesplex2_docker_keep_volumes
# Type: bool (true/false)
plex_role_docker_keep_volumes:
# Type: bool (true/false)
plex2_docker_keep_volumes:
plex_role_docker_storage_optsplex2_docker_storage_opts
# Type: dict
plex_role_docker_storage_opts:
# Type: dict
plex2_docker_storage_opts:
plex_role_docker_tmpfsplex2_docker_tmpfs
# Type: list
plex_role_docker_tmpfs:
# Type: list
plex2_docker_tmpfs:
plex_role_docker_volume_driverplex2_docker_volume_driver
# Type: string
plex_role_docker_volume_driver:
# Type: string
plex2_docker_volume_driver:
plex_role_docker_volumes_fromplex2_docker_volumes_from
# Type: list
plex_role_docker_volumes_from:
# Type: list
plex2_docker_volumes_from:
plex_role_docker_volumes_globalplex2_docker_volumes_global
# Type: bool (true/false)
plex_role_docker_volumes_global:
# Type: bool (true/false)
plex2_docker_volumes_global:
plex_role_docker_working_dirplex2_docker_working_dir
# Type: string
plex_role_docker_working_dir:
# Type: string
plex2_docker_working_dir:
Monitoring & Lifecycle
plex_role_docker_auto_removeplex2_docker_auto_remove
# Type: bool (true/false)
plex_role_docker_auto_remove:
# Type: bool (true/false)
plex2_docker_auto_remove:
plex_role_docker_cleanupplex2_docker_cleanup
# Type: bool (true/false)
plex_role_docker_cleanup:
# Type: bool (true/false)
plex2_docker_cleanup:
plex_role_docker_force_killplex2_docker_force_kill
# Type: string
plex_role_docker_force_kill:
# Type: string
plex2_docker_force_kill:
plex_role_docker_healthcheckplex2_docker_healthcheck
# Type: dict
plex_role_docker_healthcheck:
# Type: dict
plex2_docker_healthcheck:
plex_role_docker_healthy_wait_timeoutplex2_docker_healthy_wait_timeout
# Type: int
plex_role_docker_healthy_wait_timeout:
# Type: int
plex2_docker_healthy_wait_timeout:
plex_role_docker_initplex2_docker_init
# Type: bool (true/false)
plex_role_docker_init:
# Type: bool (true/false)
plex2_docker_init:
plex_role_docker_kill_signalplex2_docker_kill_signal
# Type: string
plex_role_docker_kill_signal:
# Type: string
plex2_docker_kill_signal:
plex_role_docker_log_driverplex2_docker_log_driver
# Type: string
plex_role_docker_log_driver:
# Type: string
plex2_docker_log_driver:
plex_role_docker_log_optionsplex2_docker_log_options
# Type: dict
plex_role_docker_log_options:
# Type: dict
plex2_docker_log_options:
plex_role_docker_oom_killerplex2_docker_oom_killer
# Type: bool (true/false)
plex_role_docker_oom_killer:
# Type: bool (true/false)
plex2_docker_oom_killer:
plex_role_docker_oom_score_adjplex2_docker_oom_score_adj
# Type: int
plex_role_docker_oom_score_adj:
# Type: int
plex2_docker_oom_score_adj:
plex_role_docker_output_logsplex2_docker_output_logs
# Type: bool (true/false)
plex_role_docker_output_logs:
# Type: bool (true/false)
plex2_docker_output_logs:
plex_role_docker_pausedplex2_docker_paused
# Type: bool (true/false)
plex_role_docker_paused:
# Type: bool (true/false)
plex2_docker_paused:
plex_role_docker_recreateplex2_docker_recreate
# Type: bool (true/false)
plex_role_docker_recreate:
# Type: bool (true/false)
plex2_docker_recreate:
plex_role_docker_restart_retriesplex2_docker_restart_retries
# Type: int
plex_role_docker_restart_retries:
# Type: int
plex2_docker_restart_retries:
plex_role_docker_stop_signalplex2_docker_stop_signal
# Type: string
plex_role_docker_stop_signal:
# Type: string
plex2_docker_stop_signal:
plex_role_docker_stop_timeoutplex2_docker_stop_timeout
# Type: int
plex_role_docker_stop_timeout:
# Type: int
plex2_docker_stop_timeout:
Other Options
plex_role_docker_capabilitiesplex2_docker_capabilities
# Type: list
plex_role_docker_capabilities:
# Type: list
plex2_docker_capabilities:
plex_role_docker_cgroup_parentplex2_docker_cgroup_parent
# Type: string
plex_role_docker_cgroup_parent:
# Type: string
plex2_docker_cgroup_parent:
plex_role_docker_commandsplex2_docker_commands
# Type: list
plex_role_docker_commands:
# Type: list
plex2_docker_commands:
plex_role_docker_create_timeoutplex2_docker_create_timeout
# Type: int
plex_role_docker_create_timeout:
# Type: int
plex2_docker_create_timeout:
plex_role_docker_entrypointplex2_docker_entrypoint
# Type: string
plex_role_docker_entrypoint:
# Type: string
plex2_docker_entrypoint:
plex_role_docker_env_fileplex2_docker_env_file
# Type: string
plex_role_docker_env_file:
# Type: string
plex2_docker_env_file:
plex_role_docker_labels_use_commonplex2_docker_labels_use_common
# Type: bool (true/false)
plex_role_docker_labels_use_common:
# Type: bool (true/false)
plex2_docker_labels_use_common:
plex_role_docker_read_onlyplex2_docker_read_only
# Type: bool (true/false)
plex_role_docker_read_only:
# Type: bool (true/false)
plex2_docker_read_only:
plex_role_docker_runtimeplex2_docker_runtime
# Type: string
plex_role_docker_runtime:
# Type: string
plex2_docker_runtime:
plex_role_docker_sysctlsplex2_docker_sysctls
# Type: list
plex_role_docker_sysctls:
# Type: list
plex2_docker_sysctls:
plex_role_docker_ulimitsplex2_docker_ulimits
# Type: list
plex_role_docker_ulimits:
# Type: list
plex2_docker_ulimits:
plex_role_autoheal_enabledplex2_autoheal_enabled
# Enable or disable Autoheal monitoring for containers created when deploying
# Type: bool (true/false)
plex_role_autoheal_enabled: true
# Enable or disable Autoheal monitoring for containers created when deploying
# Type: bool (true/false)
plex2_autoheal_enabled: true
plex_role_depends_onplex2_depends_on
# List of container dependencies that must be running before containers start
# Type: string
plex_role_depends_on: ""
# List of container dependencies that must be running before containers start
# Type: string
plex2_depends_on: ""
plex_role_depends_on_delayplex2_depends_on_delay
# Delay in seconds before starting containers after dependencies are ready
# Type: string (quoted number)
plex_role_depends_on_delay: "0"
# Delay in seconds before starting containers after dependencies are ready
# Type: string (quoted number)
plex2_depends_on_delay: "0"
plex_role_depends_on_healthchecksplex2_depends_on_healthchecks
# Enable healthcheck waiting for container dependencies
# Type: string ("true"/"false")
plex_role_depends_on_healthchecks:
# Enable healthcheck waiting for container dependencies
# Type: string ("true"/"false")
plex2_depends_on_healthchecks:
plex_role_diun_enabledplex2_diun_enabled
# Enable or disable Diun update notifications for containers created when deploying
# Type: bool (true/false)
plex_role_diun_enabled: true
# Enable or disable Diun update notifications for containers created when deploying
# Type: bool (true/false)
plex2_diun_enabled: true
plex_role_dns_enabledplex2_dns_enabled
# Enable or disable automatic DNS record creation for containers
# Type: bool (true/false)
plex_role_dns_enabled: true
# Enable or disable automatic DNS record creation for containers
# Type: bool (true/false)
plex2_dns_enabled: true
plex_role_docker_controllerplex2_docker_controller
# Enable or disable Saltbox Docker Controller management for containers
# Type: bool (true/false)
plex_role_docker_controller: true
# Enable or disable Saltbox Docker Controller management for containers
# Type: bool (true/false)
plex2_docker_controller: true
plex_role_docker_networks_alias_customplex2_docker_networks_alias_custom
# Type: list
plex_role_docker_networks_alias_custom:
# Type: list
plex2_docker_networks_alias_custom:
plex_role_docker_volumes_downloadplex2_docker_volumes_download
# Type: bool (true/false)
plex_role_docker_volumes_download:
# Type: bool (true/false)
plex2_docker_volumes_download:
plex_role_themepark_appplex2_themepark_app
# Type: string
plex_role_themepark_app:
# Type: string
plex2_themepark_app:
plex_role_traefik_api_middlewareplex2_traefik_api_middleware
# Type: string
plex_role_traefik_api_middleware:
# Type: string
plex2_traefik_api_middleware:
plex_role_traefik_api_middleware_httpplex2_traefik_api_middleware_http
# Type: string
plex_role_traefik_api_middleware_http:
# Type: string
plex2_traefik_api_middleware_http:
plex_role_traefik_autodetect_enabledplex2_traefik_autodetect_enabled
# Enable Traefik autodetect middleware for containers
# Type: bool (true/false)
plex_role_traefik_autodetect_enabled: false
# Enable Traefik autodetect middleware for containers
# Type: bool (true/false)
plex2_traefik_autodetect_enabled: false
plex_role_traefik_crowdsec_enabledplex2_traefik_crowdsec_enabled
# Enable CrowdSec middleware for containers
# Type: bool (true/false)
plex_role_traefik_crowdsec_enabled: false
# Enable CrowdSec middleware for containers
# Type: bool (true/false)
plex2_traefik_crowdsec_enabled: false
plex_role_traefik_middleware_httpplex2_traefik_middleware_http
# Type: string
plex_role_traefik_middleware_http:
# Type: string
plex2_traefik_middleware_http:
plex_role_traefik_middleware_http_api_insecureplex2_traefik_middleware_http_api_insecure
# Type: bool (true/false)
plex_role_traefik_middleware_http_api_insecure:
# Type: bool (true/false)
plex2_traefik_middleware_http_api_insecure:
plex_role_traefik_priorityplex2_traefik_priority
# Type: string
plex_role_traefik_priority:
# Type: string
plex2_traefik_priority:
plex_role_traefik_robot_enabledplex2_traefik_robot_enabled
# Enable robots.txt middleware for containers
# Type: bool (true/false)
plex_role_traefik_robot_enabled: true
# Enable robots.txt middleware for containers
# Type: bool (true/false)
plex2_traefik_robot_enabled: true
plex_role_traefik_tailscale_enabledplex2_traefik_tailscale_enabled
# Enable Tailscale-specific Traefik configuration for containers
# Type: bool (true/false)
plex_role_traefik_tailscale_enabled: false
# Enable Tailscale-specific Traefik configuration for containers
# Type: bool (true/false)
plex2_traefik_tailscale_enabled: false
plex_role_traefik_wildcard_enabledplex2_traefik_wildcard_enabled
# Enable wildcard certificate for containers
# Type: bool (true/false)
plex_role_traefik_wildcard_enabled: true
# Enable wildcard certificate for containers
# Type: bool (true/false)
plex2_traefik_wildcard_enabled: true
plex_role_web_api_http_portplex2_web_api_http_port
# Type: string (quoted number)
plex_role_web_api_http_port:
# Type: string (quoted number)
plex2_web_api_http_port:
plex_role_web_api_http_schemeplex2_web_api_http_scheme
# Type: string ("http"/"https")
plex_role_web_api_http_scheme:
# Type: string ("http"/"https")
plex2_web_api_http_scheme:
plex_role_web_api_http_serverstransportplex2_web_api_http_serverstransport
# Type: dict/omit
plex_role_web_api_http_serverstransport:
# Type: dict/omit
plex2_web_api_http_serverstransport:
plex_role_web_api_portplex2_web_api_port
# Type: string (quoted number)
plex_role_web_api_port:
# Type: string (quoted number)
plex2_web_api_port:
plex_role_web_api_schemeplex2_web_api_scheme
# Type: string ("http"/"https")
plex_role_web_api_scheme:
# Type: string ("http"/"https")
plex2_web_api_scheme:
plex_role_web_api_serverstransportplex2_web_api_serverstransport
# Type: dict/omit
plex_role_web_api_serverstransport:
# Type: dict/omit
plex2_web_api_serverstransport:
plex_role_web_fqdn_overrideplex2_web_fqdn_override
# Override the Traefik fully qualified domain name (FQDN) for containers
# Type: list
plex_role_web_fqdn_override:
# Override the Traefik fully qualified domain name (FQDN) for containers
# Type: list
plex2_web_fqdn_override:
Example Override
plex_role_web_fqdn_override:
- "{{ traefik_host }}"
- "plex2.{{ user.domain }}"
- "plex.otherdomain.tld"
Note: Include {{ traefik_host }} to preserve the default FQDN alongside your custom entries
Example Override
plex2_web_fqdn_override:
- "{{ traefik_host }}"
- "plex2.{{ user.domain }}"
- "plex.otherdomain.tld"
Note: Include {{ traefik_host }} to preserve the default FQDN alongside your custom entries
plex_role_web_host_overrideplex2_web_host_override
# Override the Traefik web host configuration for containers
# Type: string
plex_role_web_host_override:
# Override the Traefik web host configuration for containers
# Type: string
plex2_web_host_override:
Example Override
plex_role_web_host_override: "Host(`{{ traefik_host }}`) || Host(`{{ 'plex2.' + user.domain }}`)"
Note: Use {{ traefik_host }} to include the default host configuration in your custom rule
Example Override
plex2_web_host_override: "Host(`{{ traefik_host }}`) || Host(`{{ 'plex2.' + user.domain }}`)"
Note: Use {{ traefik_host }} to include the default host configuration in your custom rule
plex_role_web_http_schemeplex2_web_http_scheme
# Type: string ("http"/"https")
plex_role_web_http_scheme:
# Type: string ("http"/"https")
plex2_web_http_scheme:
plex_role_web_http_serverstransportplex2_web_http_serverstransport
# Type: dict/omit
plex_role_web_http_serverstransport:
# Type: dict/omit
plex2_web_http_serverstransport:
plex_role_web_schemeplex2_web_scheme
# URL scheme to use for web access to containers
# Type: string ("http"/"https")
plex_role_web_scheme:
# URL scheme to use for web access to containers
# Type: string ("http"/"https")
plex2_web_scheme: